OrthoScribe Standalone User Guide
Comprehensive reference for standalone users.
Built by surgeons, for surgeons. OrthoScribe reduces documentation time with two complementary products: Wireless Mic (Speech‑to‑Text + Macros) and the AI Note Service (structured clinical notes). This guide consolidates setup, daily workflows, team collaboration, exports, tips, and troubleshooting for non-integrated, standalone users.
OrthoScribe Apps
Everything you need to streamline clinical documentation and reduce time spent on notes
iPhone App
Main interface for AI-powered note generation
- Ambient audio capture
- Structured note generation
- Voice macro support
Web Portal
Comprehensive dashboard for reviewing notes, settings, and team collaboration
- Review & edit notes
- Manage macros & procedures
- Export to EMR
Desktop Wireless Mic
Real-time Speech-to-Text with macro support; straight to your desktop cursor
Apple Watch Companion
Quick, low-distraction recording device for visits
1. Install & Setup Checklist
1. Download OrthoScribe
2. Download Speech to Text Desktop App
Optional: Install Desktop app (Wireless Mic) for dictation anywhere
3. Configure Key Settings
- • Speech to Text → Word Swap (custom vocab)
- • Automatic Coding (CPT & ICD) (enable as desired)
4. Create Macros
Create starter macros in the web portal → Macros
5. Schedule Share to Link Your Team
Build Your Own Schedule
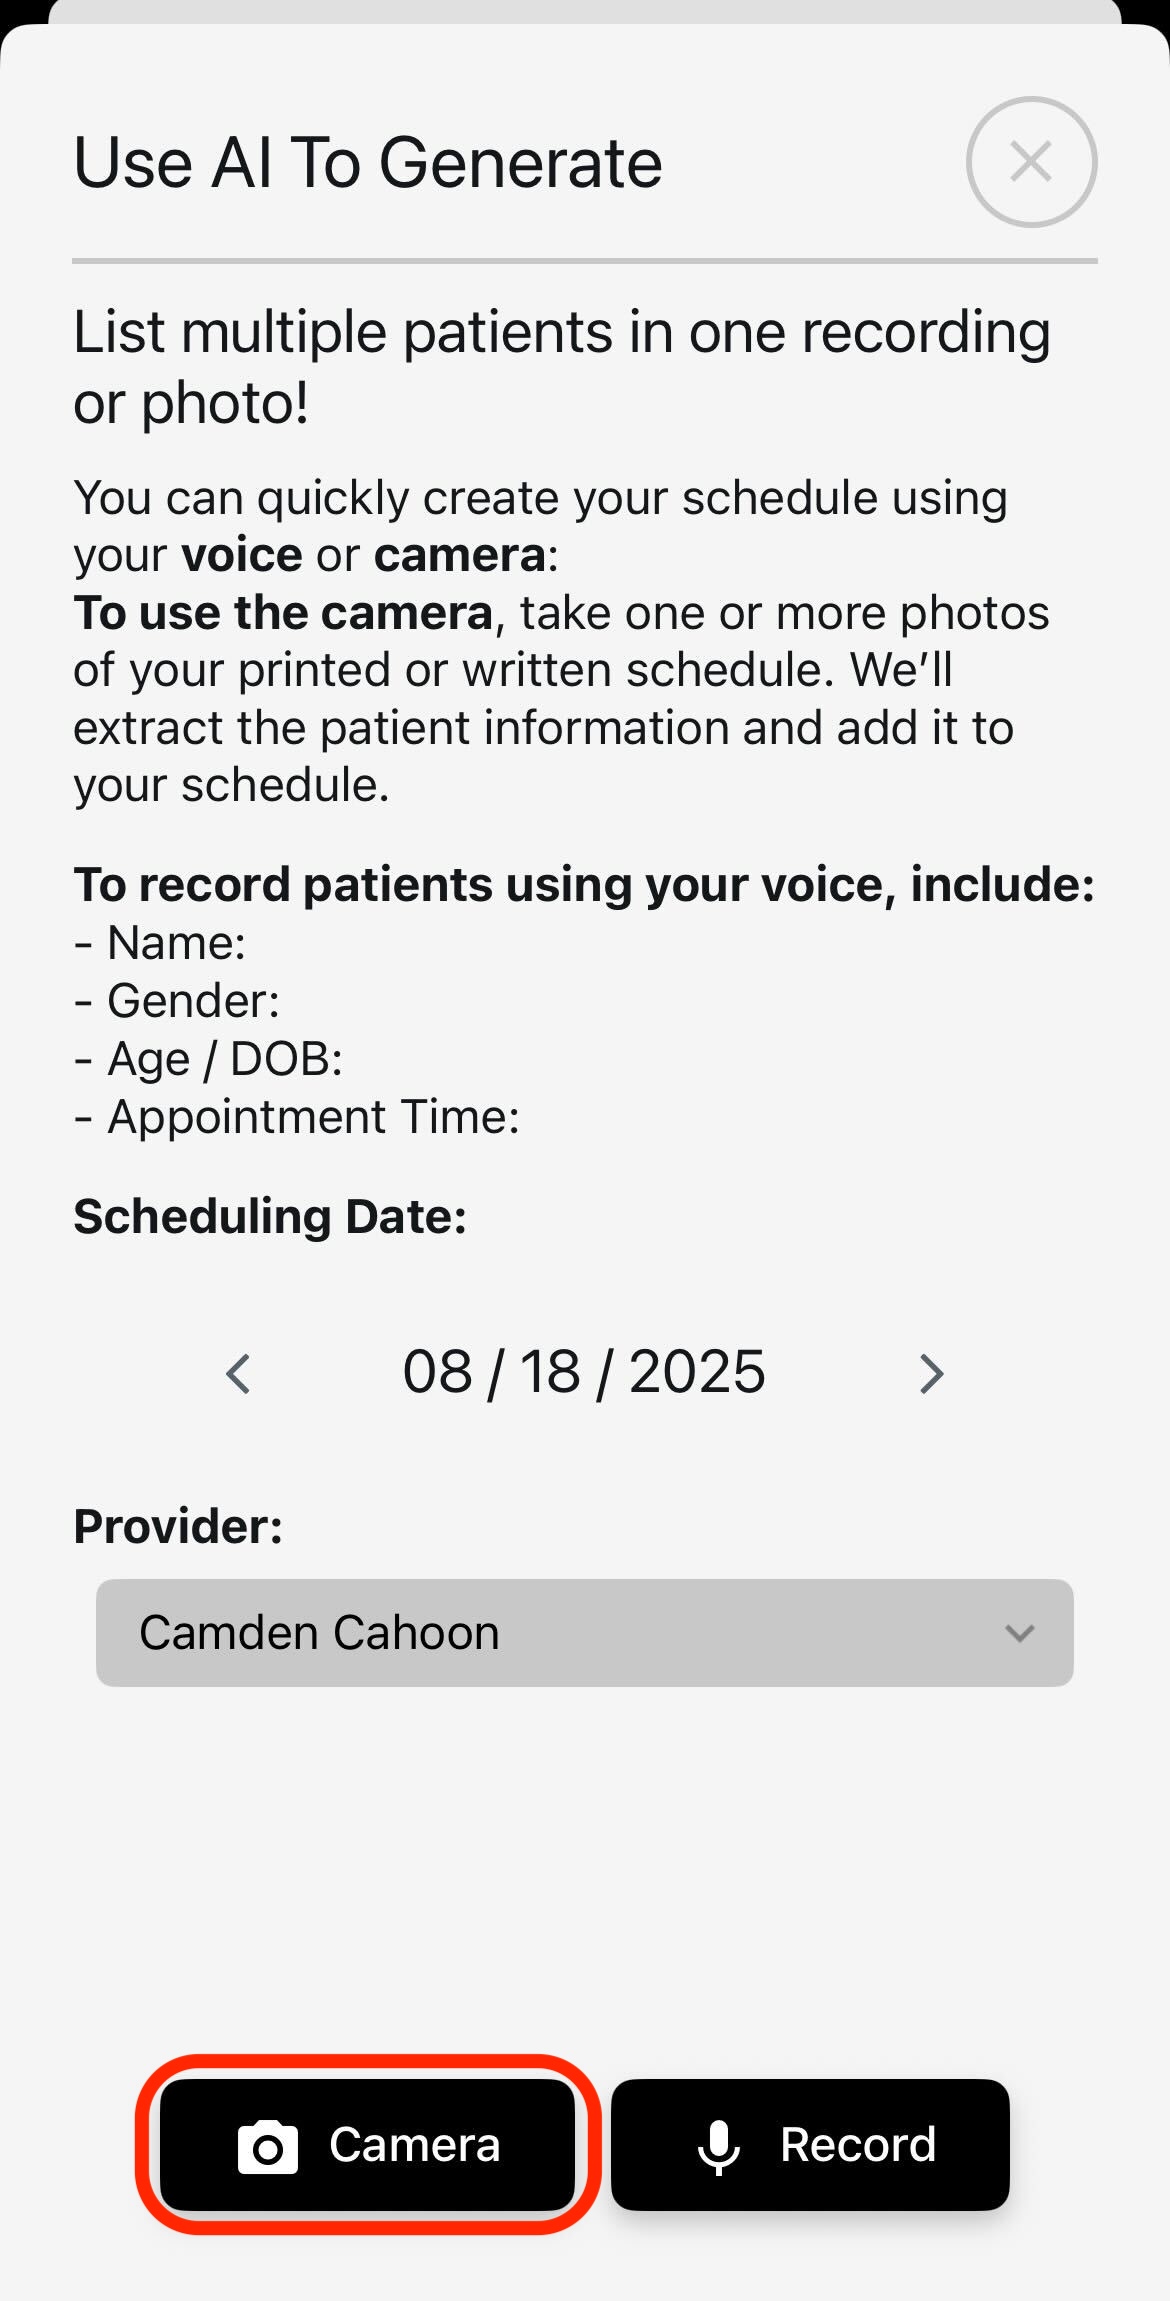
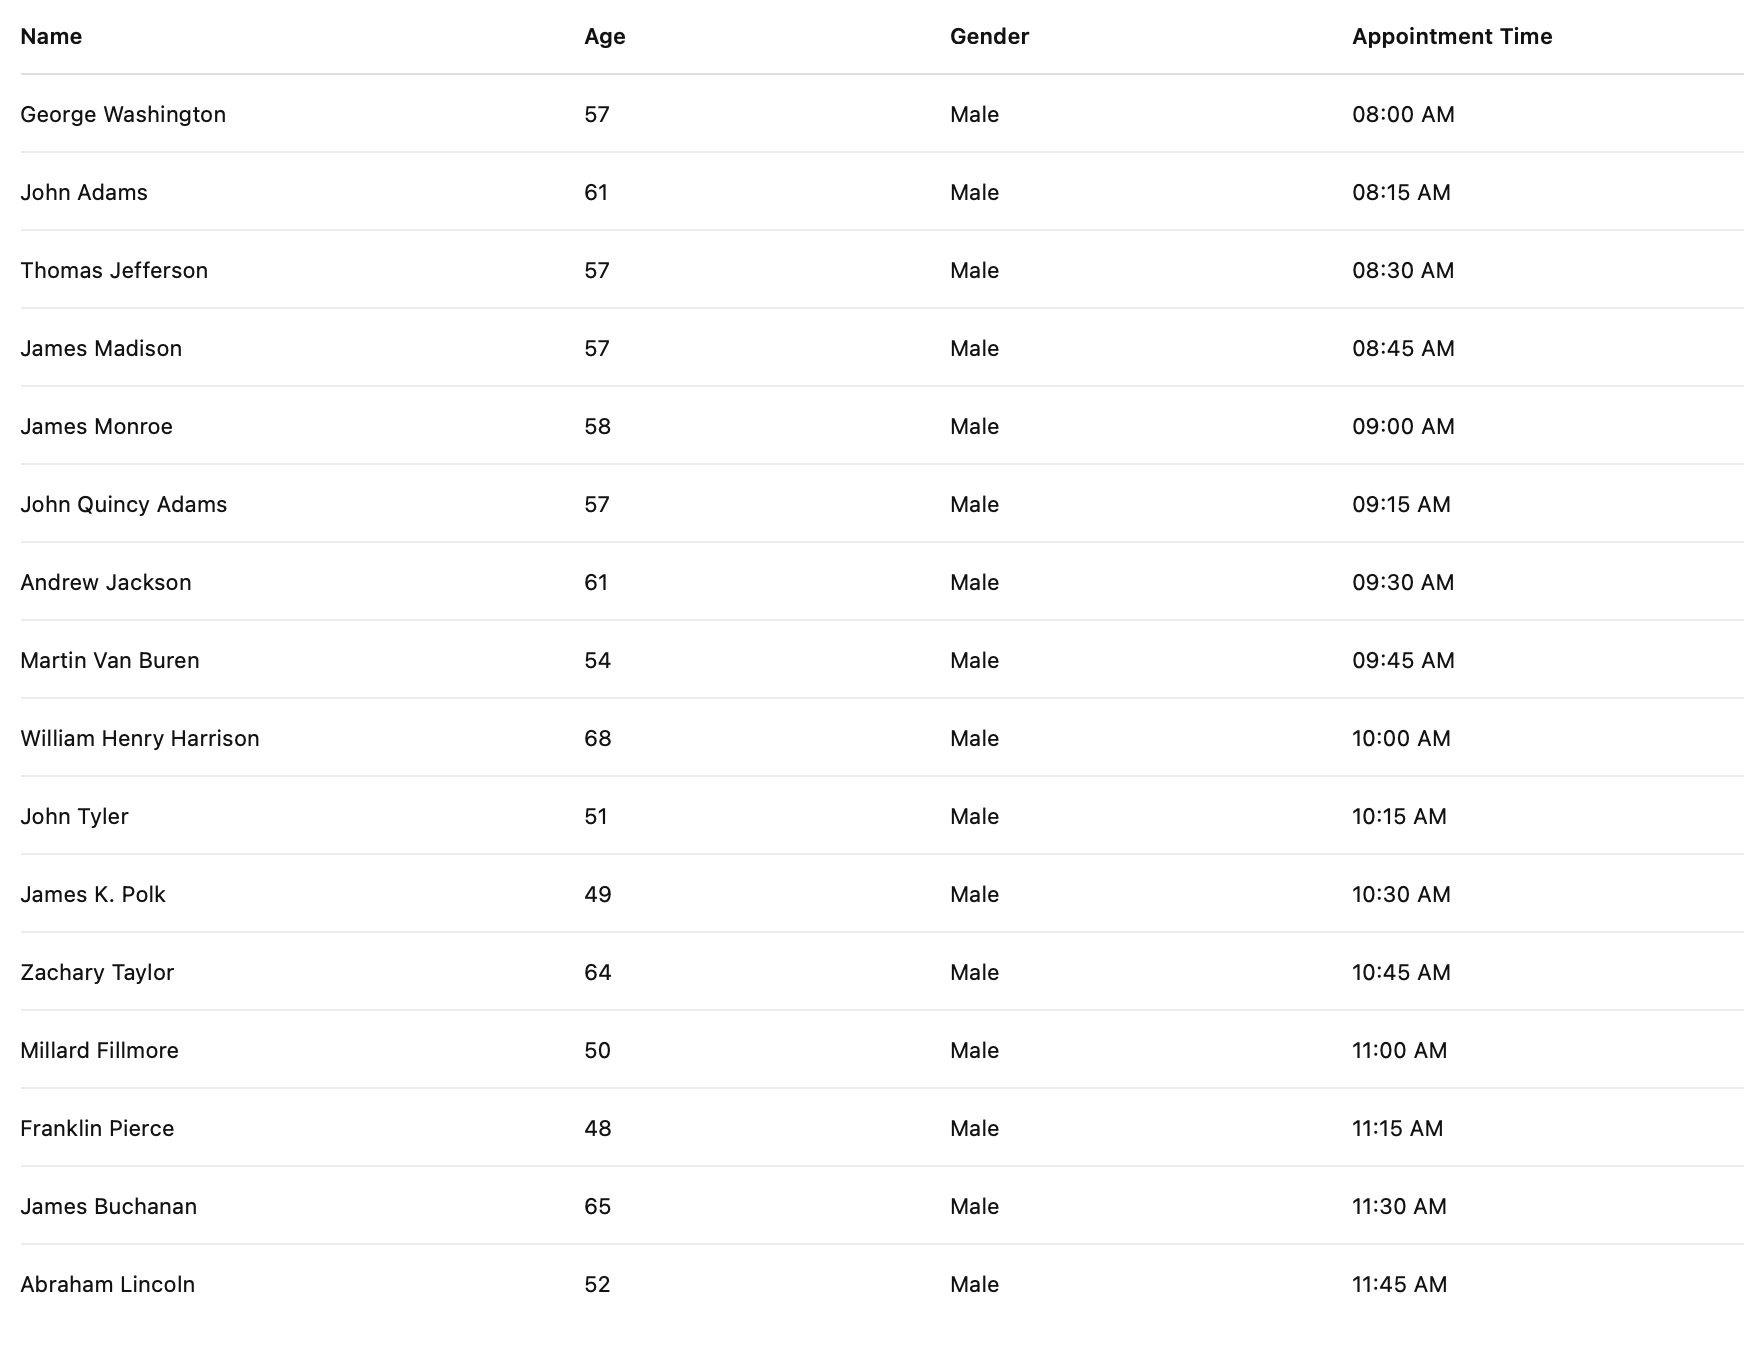
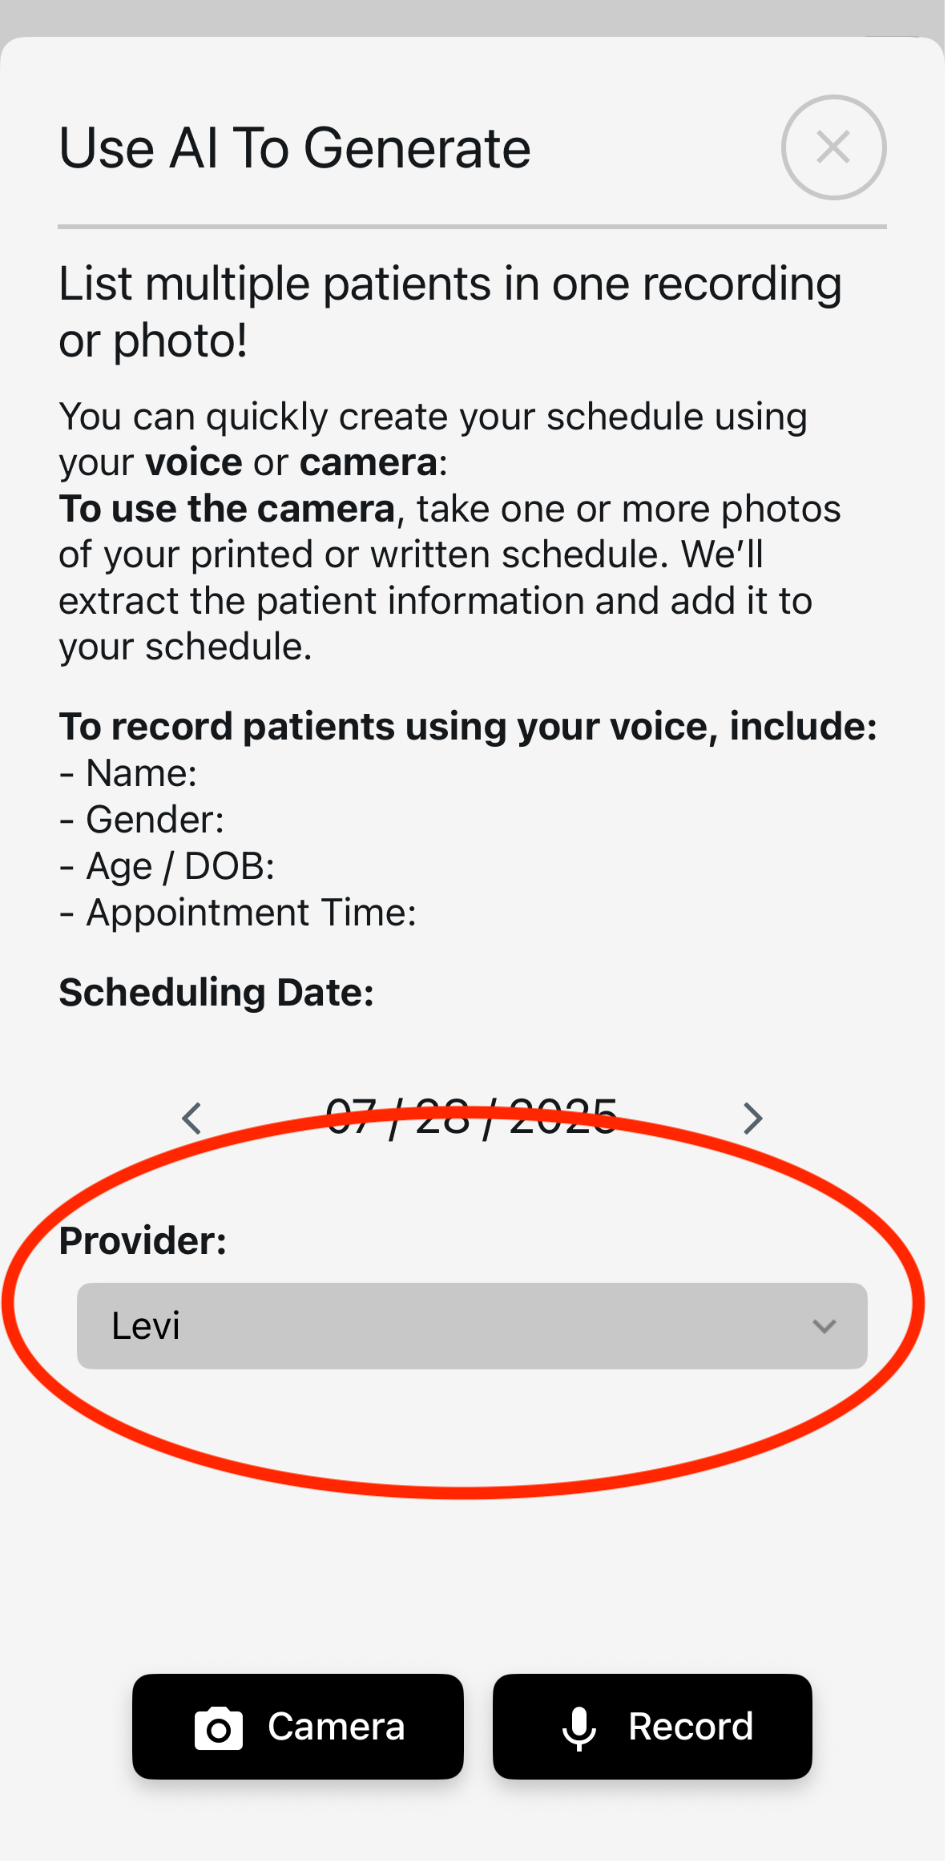
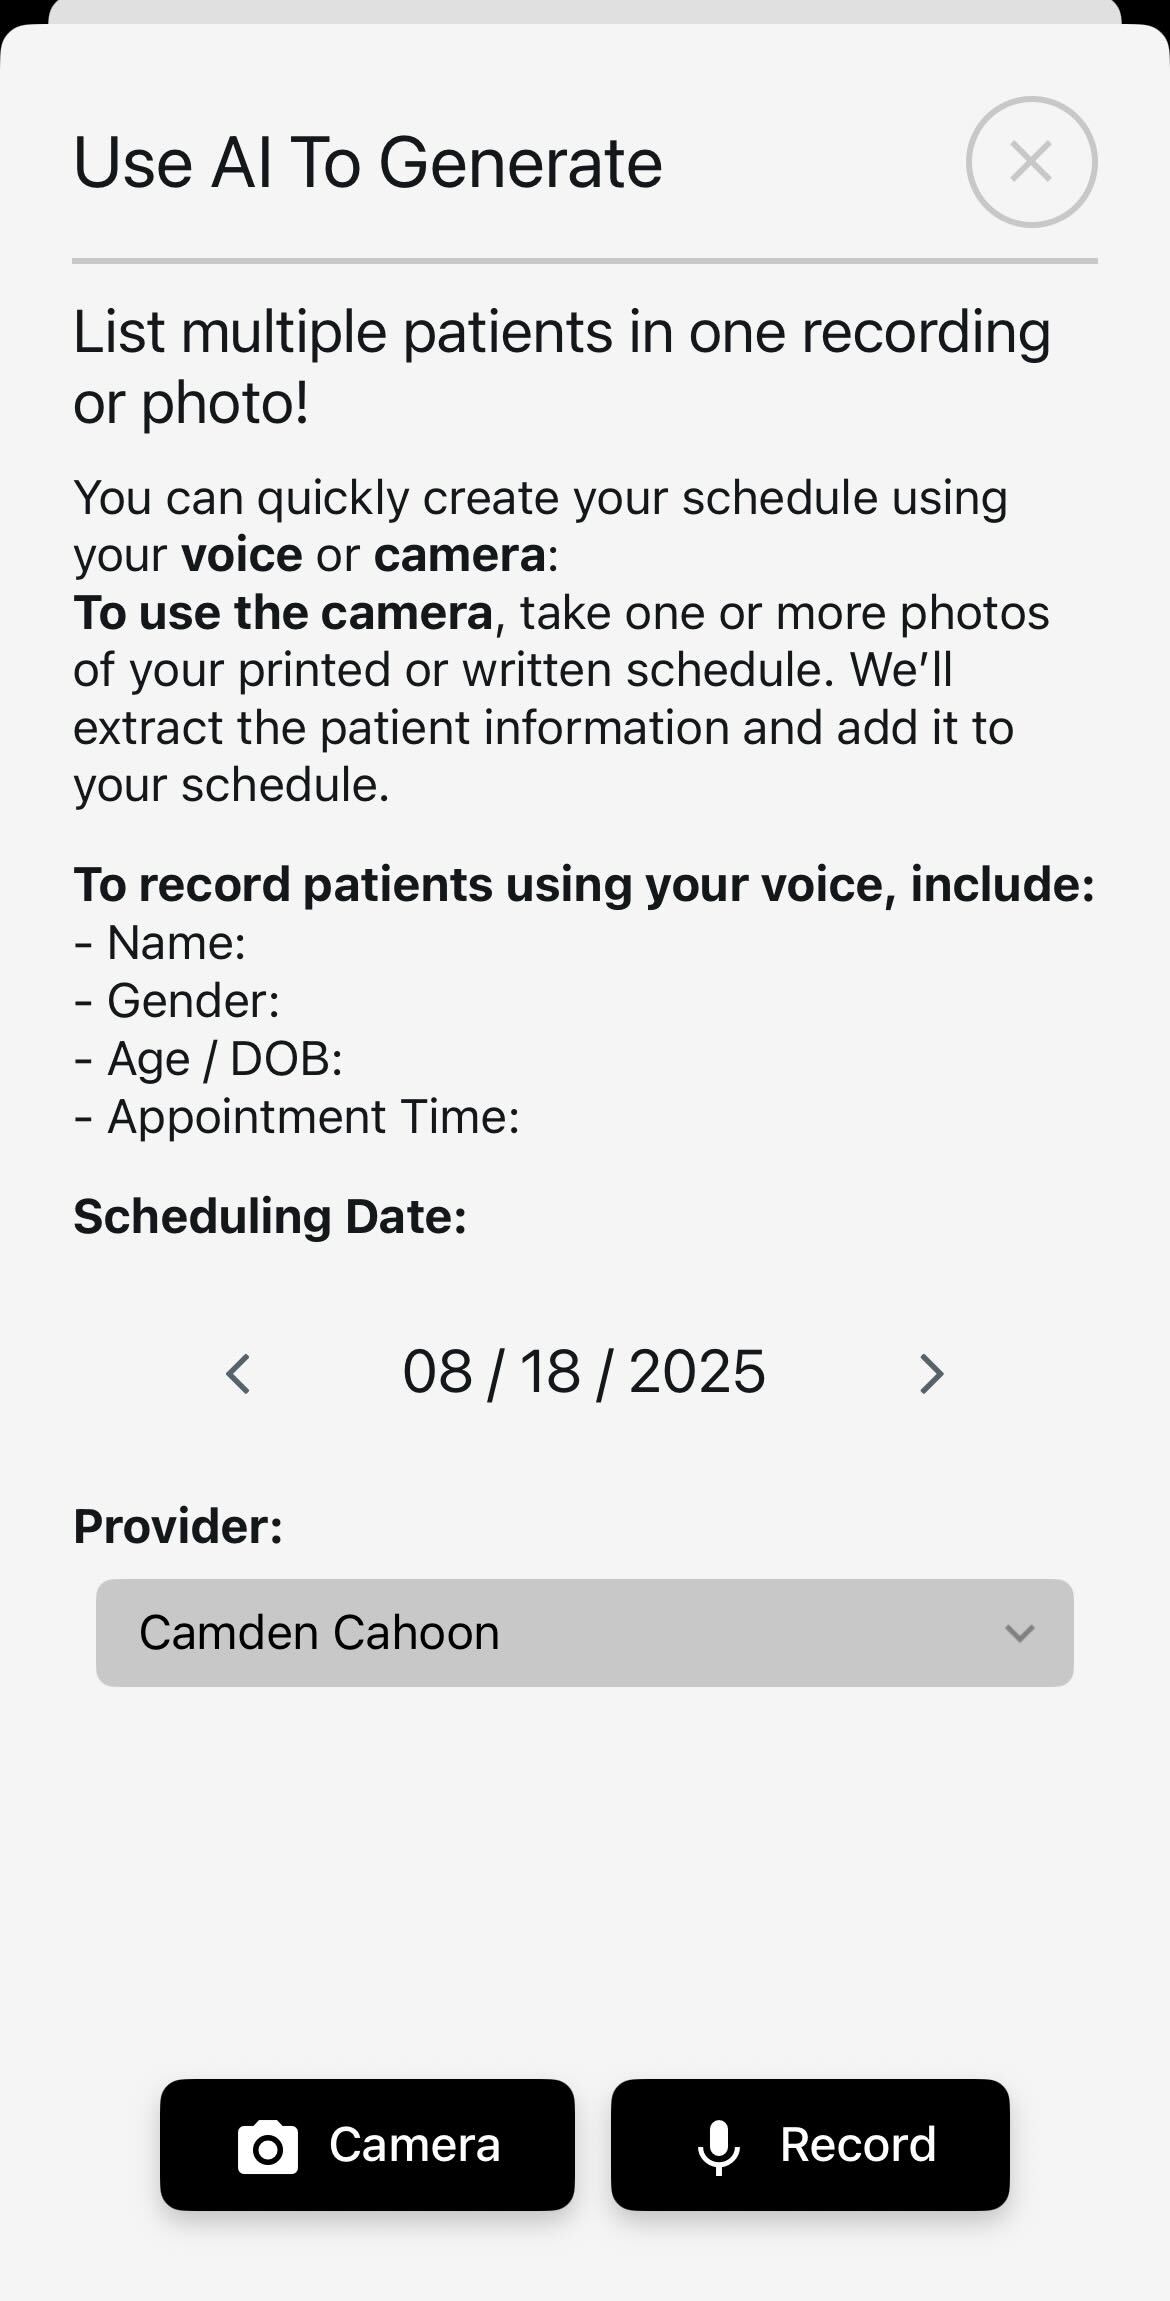
Camera (AI OCR)
Tap Add Patient, then Camera and take 1–3 photos of your printed schedule or screen. The app extracts Name, Gender, Age/DOB, Time and deduplicates.

Record (Bulk Voice)
Tap Record and read your list naturally (no pauses needed). When you stop, OrthoScribe creates encounters.
Pick Provider & Date
Verify correct Scheduling Date and Provider before capture.
Record the Visit
Ambient capture and/or direct dictation. Use macros with the "insert …" command when helpful.
Export to Your EHR
- • Go to app.orthoscribe.ai (web)
- • Open a patient and use action buttons: Copy note, Edit, Reprocess
- • Paste text into your EHR
- • Alternatively, use Wireless Mic on desktop to dictate the note directly into your EHR fields
Daily Pattern
Create schedule (Camera/Record) → Record → Review → Copy from web (or dictate via Wireless Mic) into EHR
2. Schedule Sharing & Team Collaboration
How to Upload a Schedule for a Doctor:
- Tap the icon at the bottom right corner of the Schedule page.
- Select the doctor's name from the Provider dropdown.
- Choose the correct date.
- Use the Camera or Record button to upload the schedule using a photo or voice.
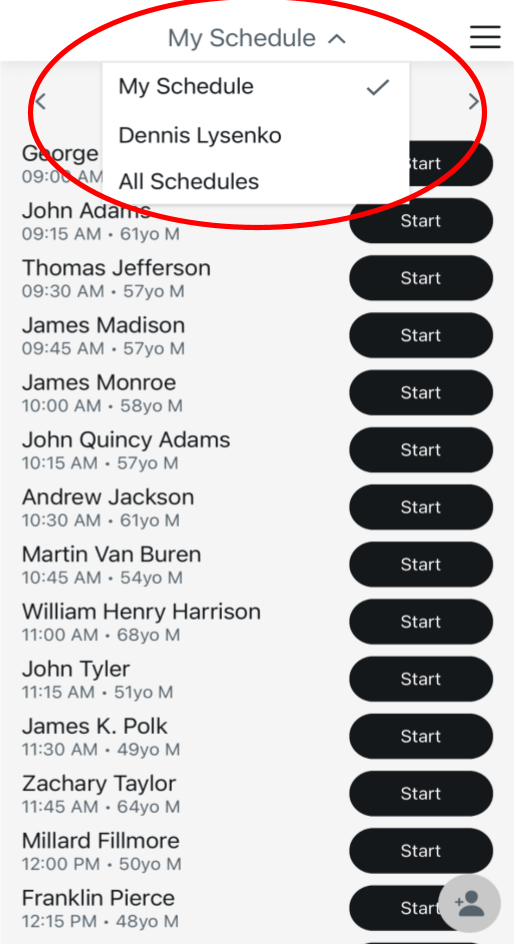
- Select the Schedule using the dropdown at the top of the Schedule page.
Setup Path
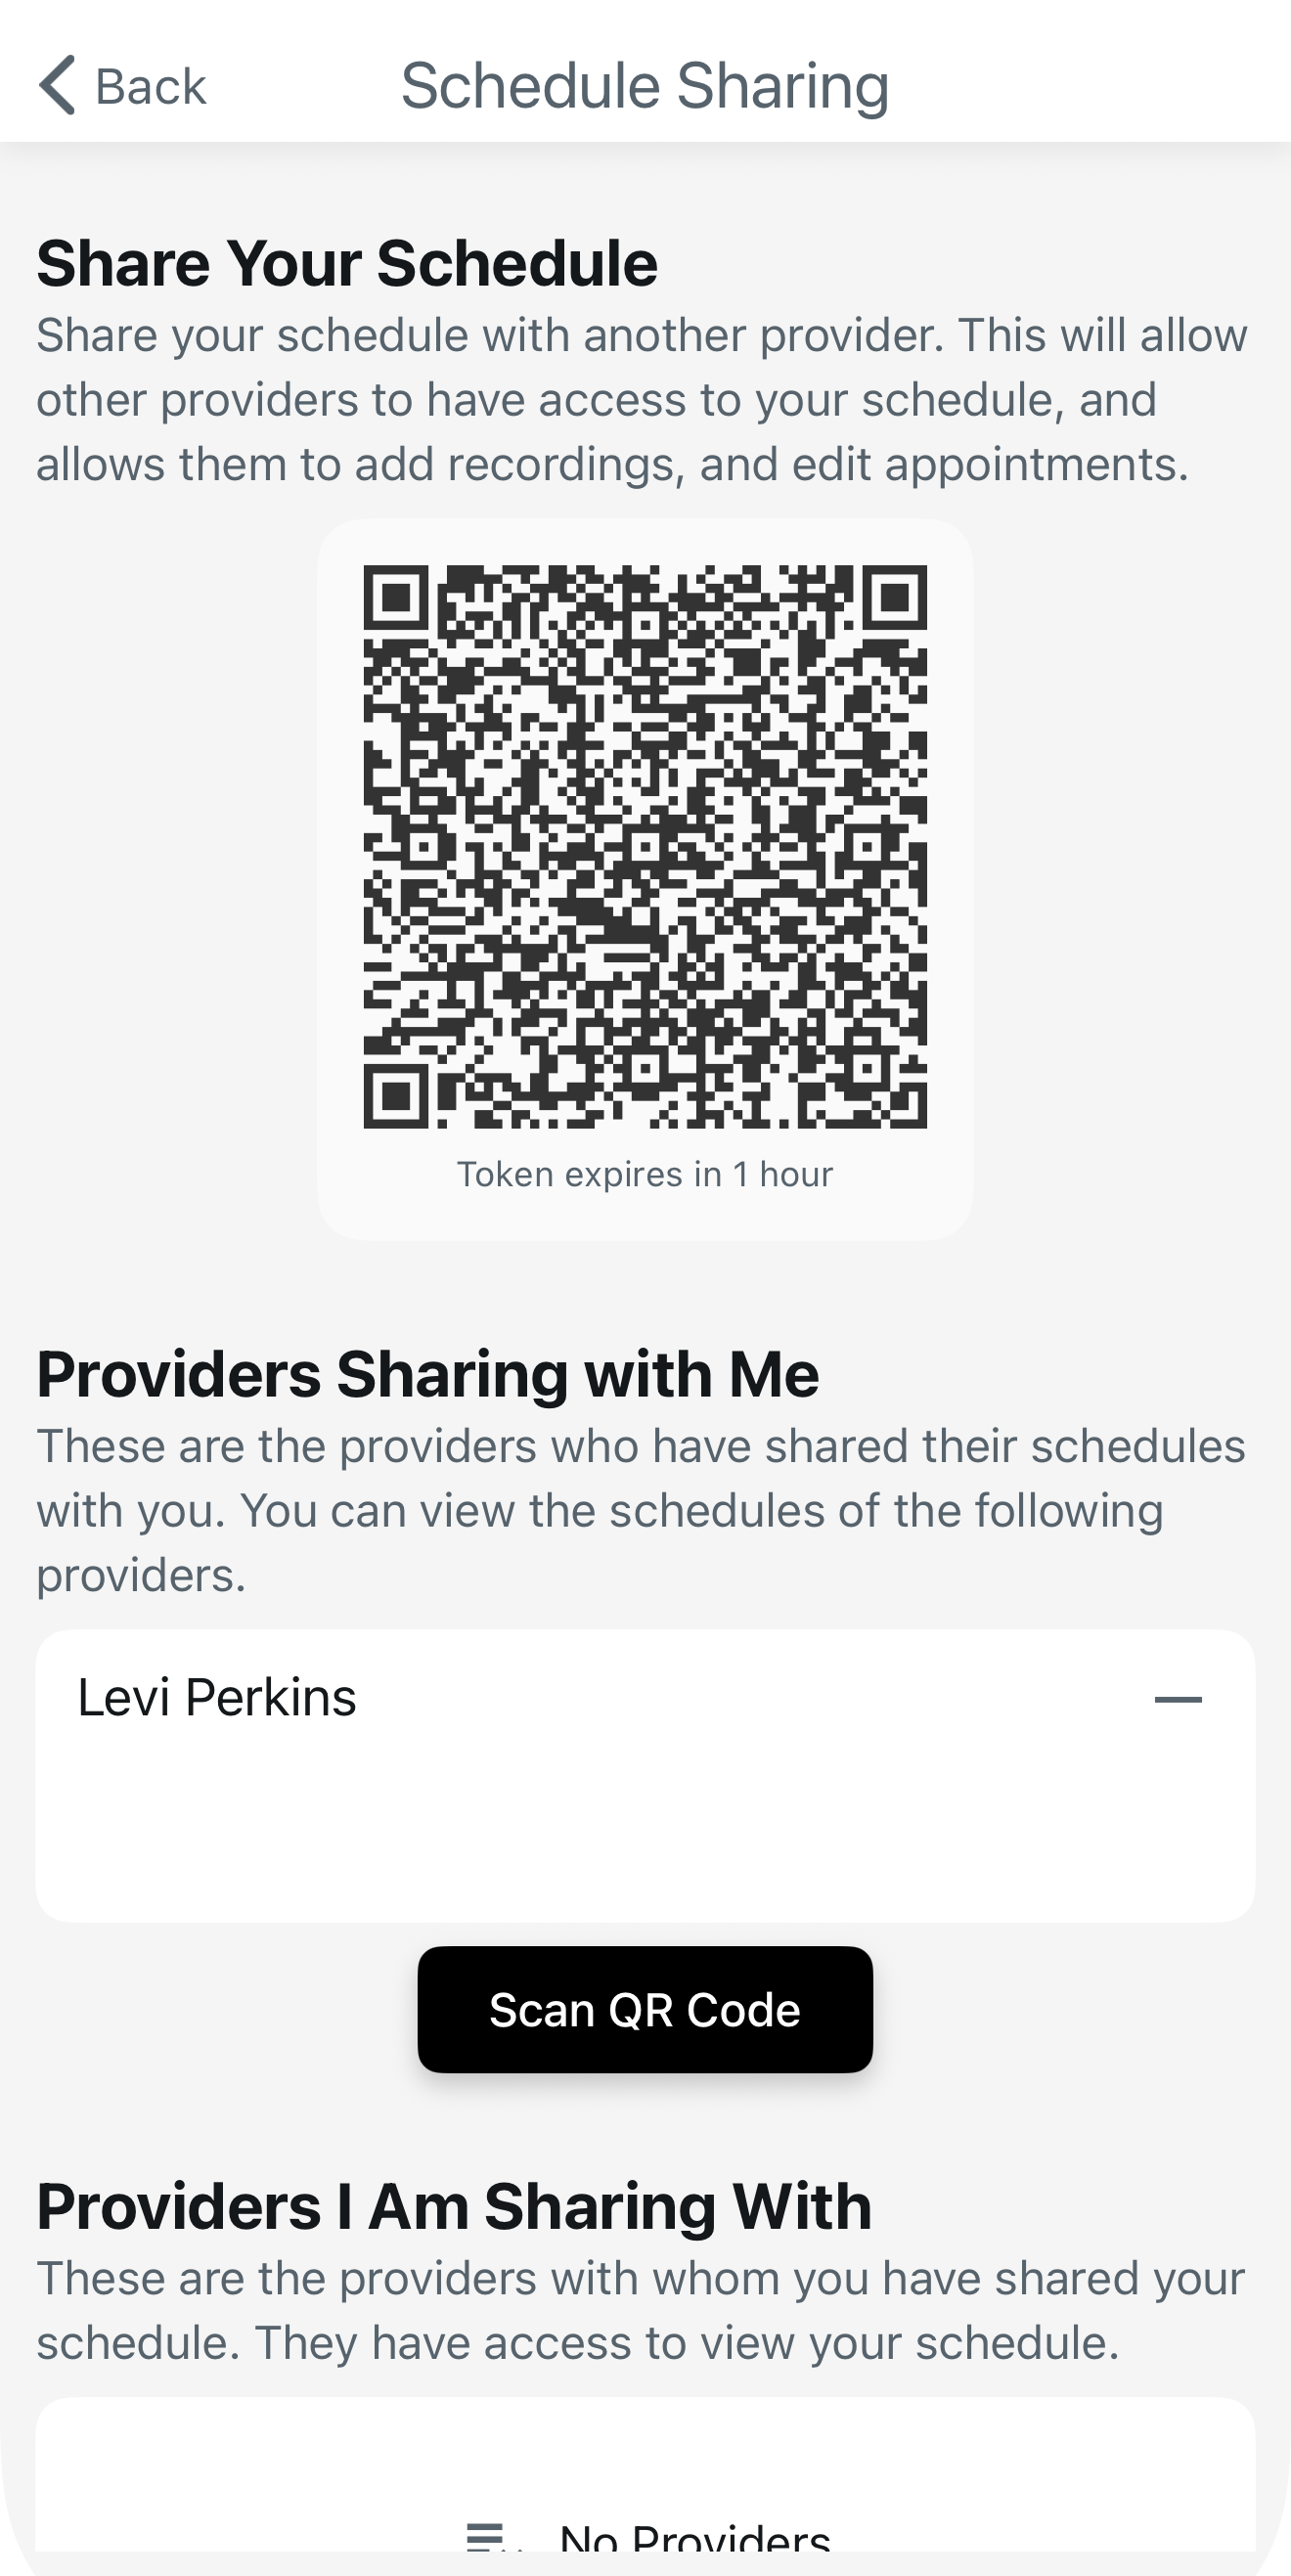
Menu → Settings → Share Schedule
Share with Provider
Send invitation. Two lists appear:
- • Providers Sharing with Me — you can view their schedules
- • Providers I Am Sharing With — they can view your schedule
QR Code Linking
One user displays a QR; the other scans in-app to link instantly.
Typical Standalone Setup
Provider shares with MA/PA. The MA creates the schedule each morning, records intake audio, and copies notes from the web portal into the EHR.
3. Recording Encounters (AI Note Service)
Getting Started
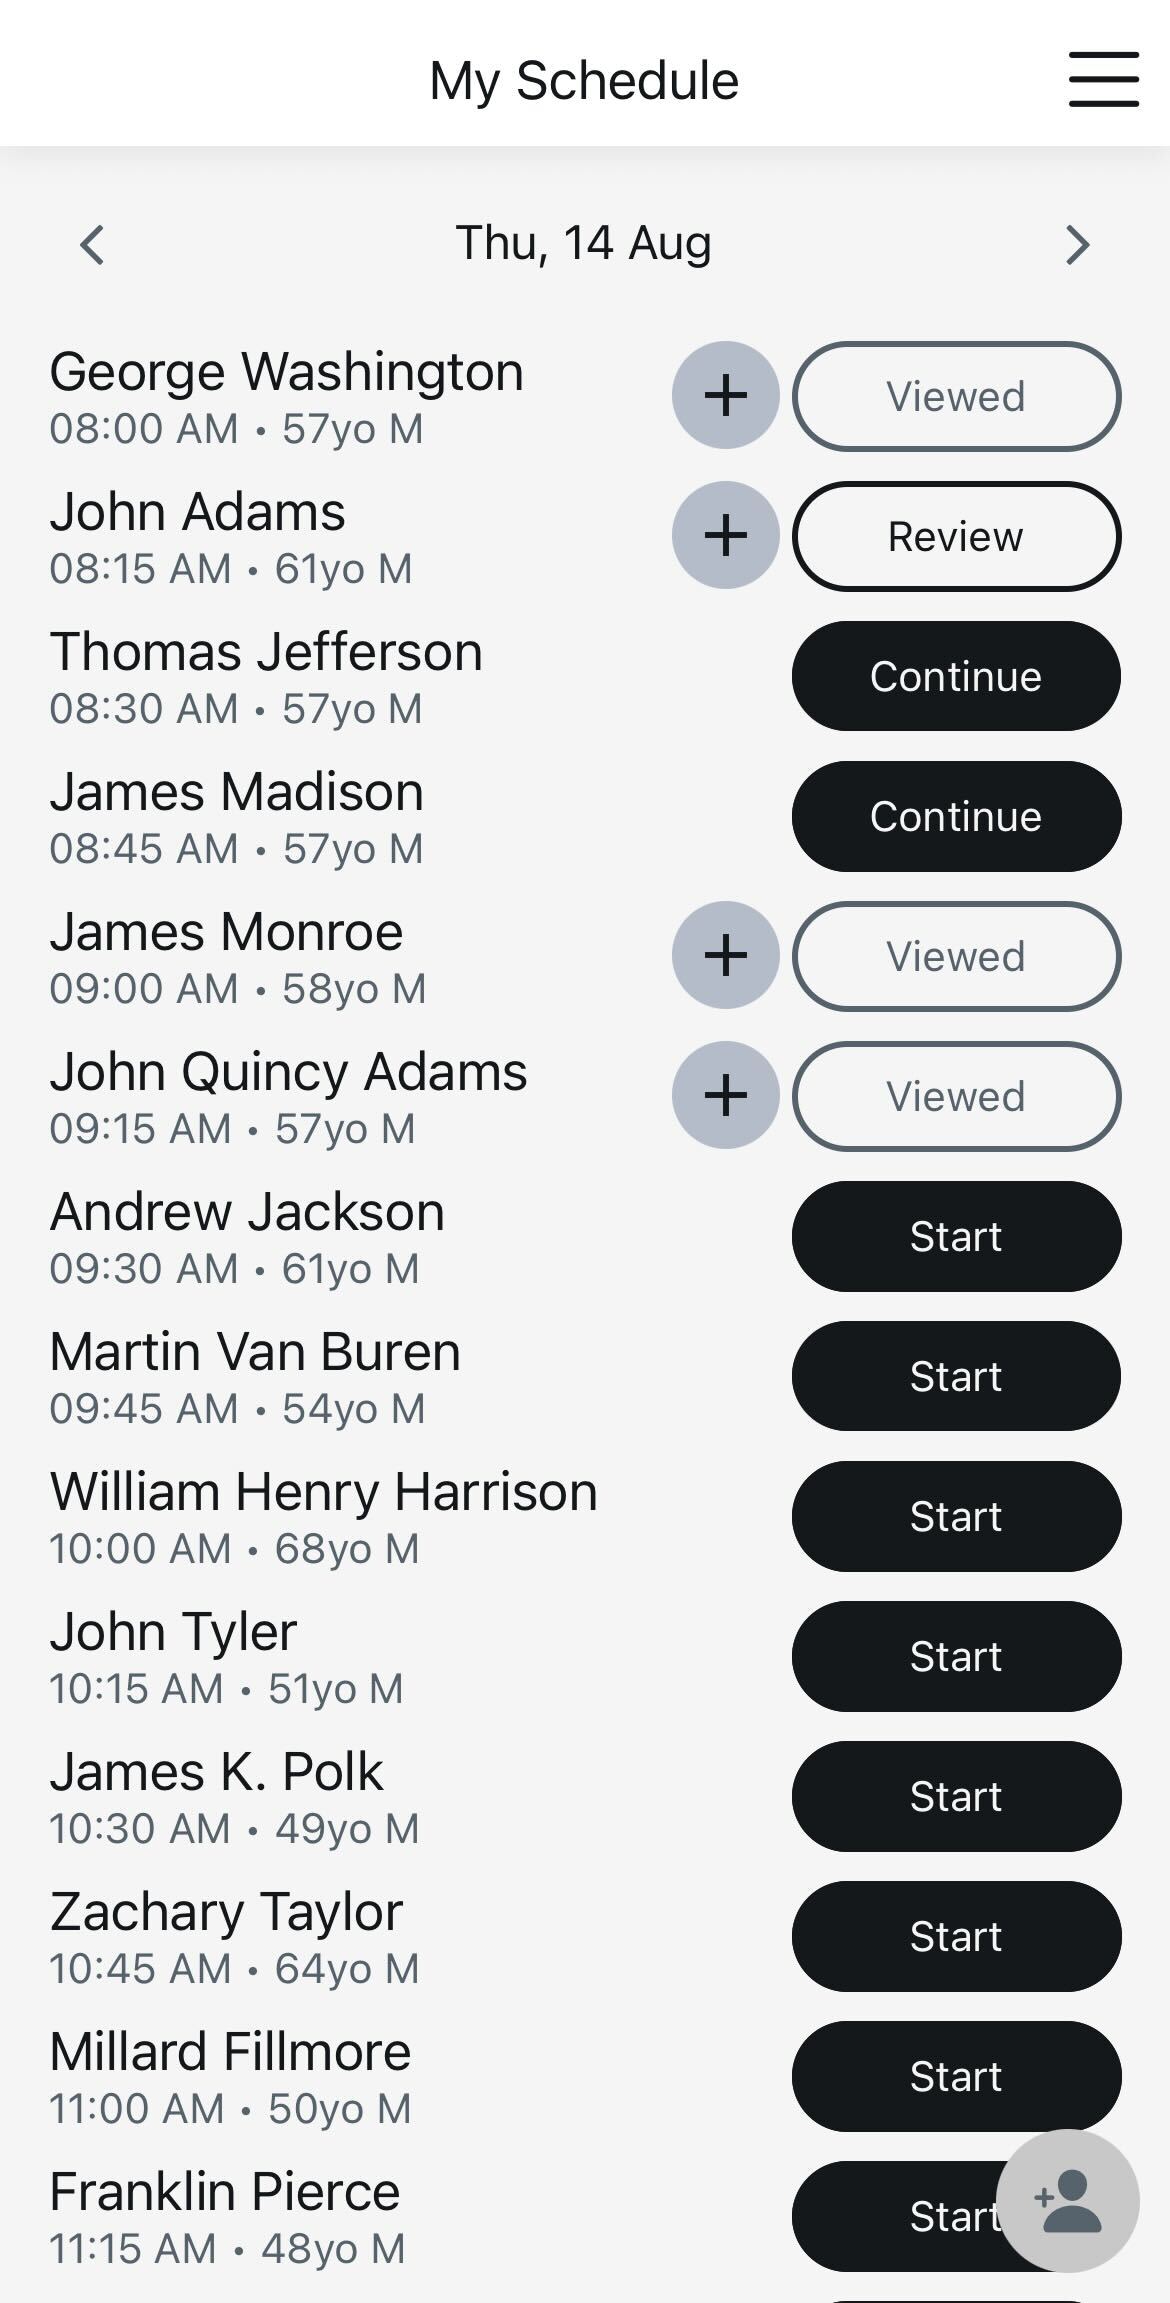
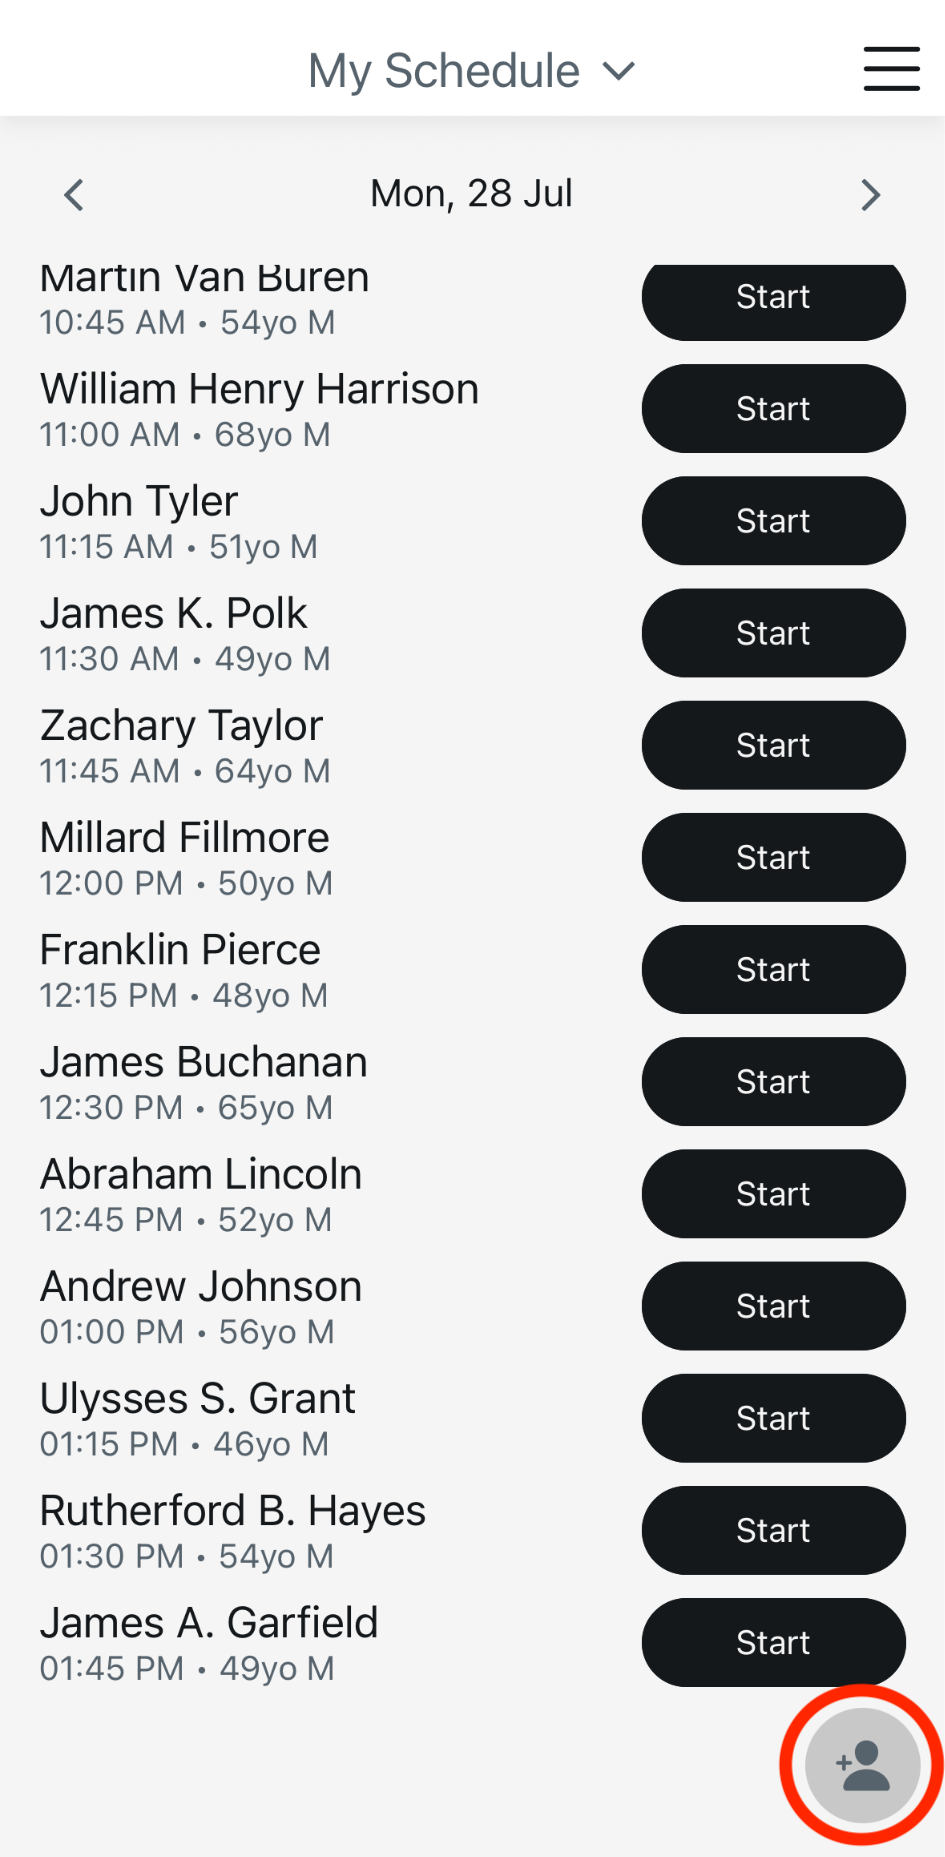
Open a patient from My Schedule → tap Start.
Recording Modes
Ambient Mode
Keep the phone nearby and speak naturally; casual conversation is okay.
Direct Dictation
Speak section-targeted details (e.g., MRI findings) exactly as you wish them transcribed.
Voice Commands
- • “Insert [macro name]”
- • “Add to Plan…”
- • “In Diagnostic Studies…” / “In Physical Exam…”
Note: Note generation can be customized based on your preferences (e.g., automatically number your plan, bullet your physical exam findings). Contact support for advanced configuration.
Finishing Up
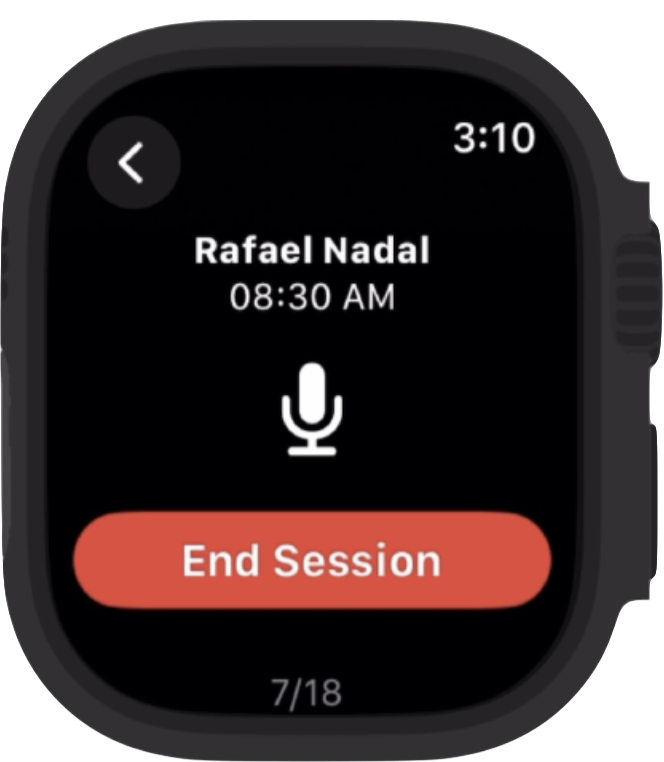
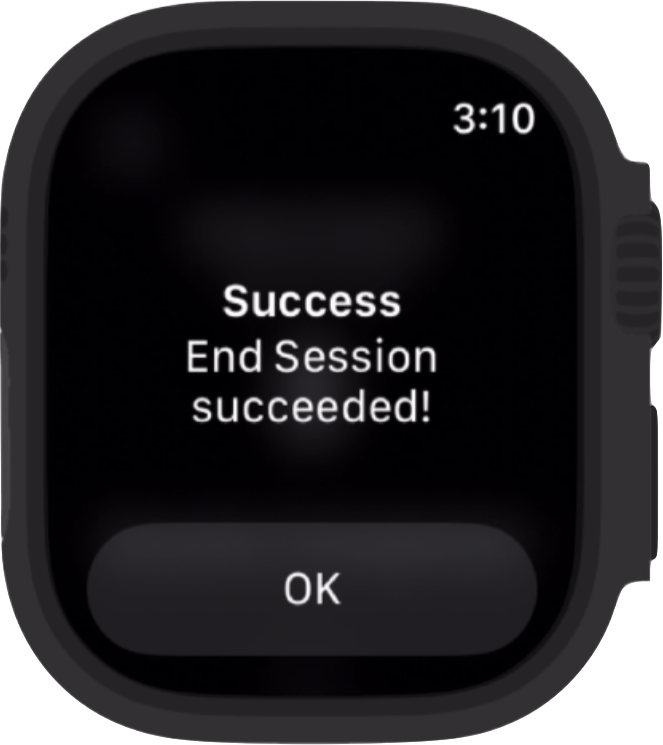
- • Tap End Session to generate the structured note
- • Use Add later to append audio and Reprocess
- • Laterality: Always state side (e.g., "right knee"). Gestures aren't recognized.
4. Macros
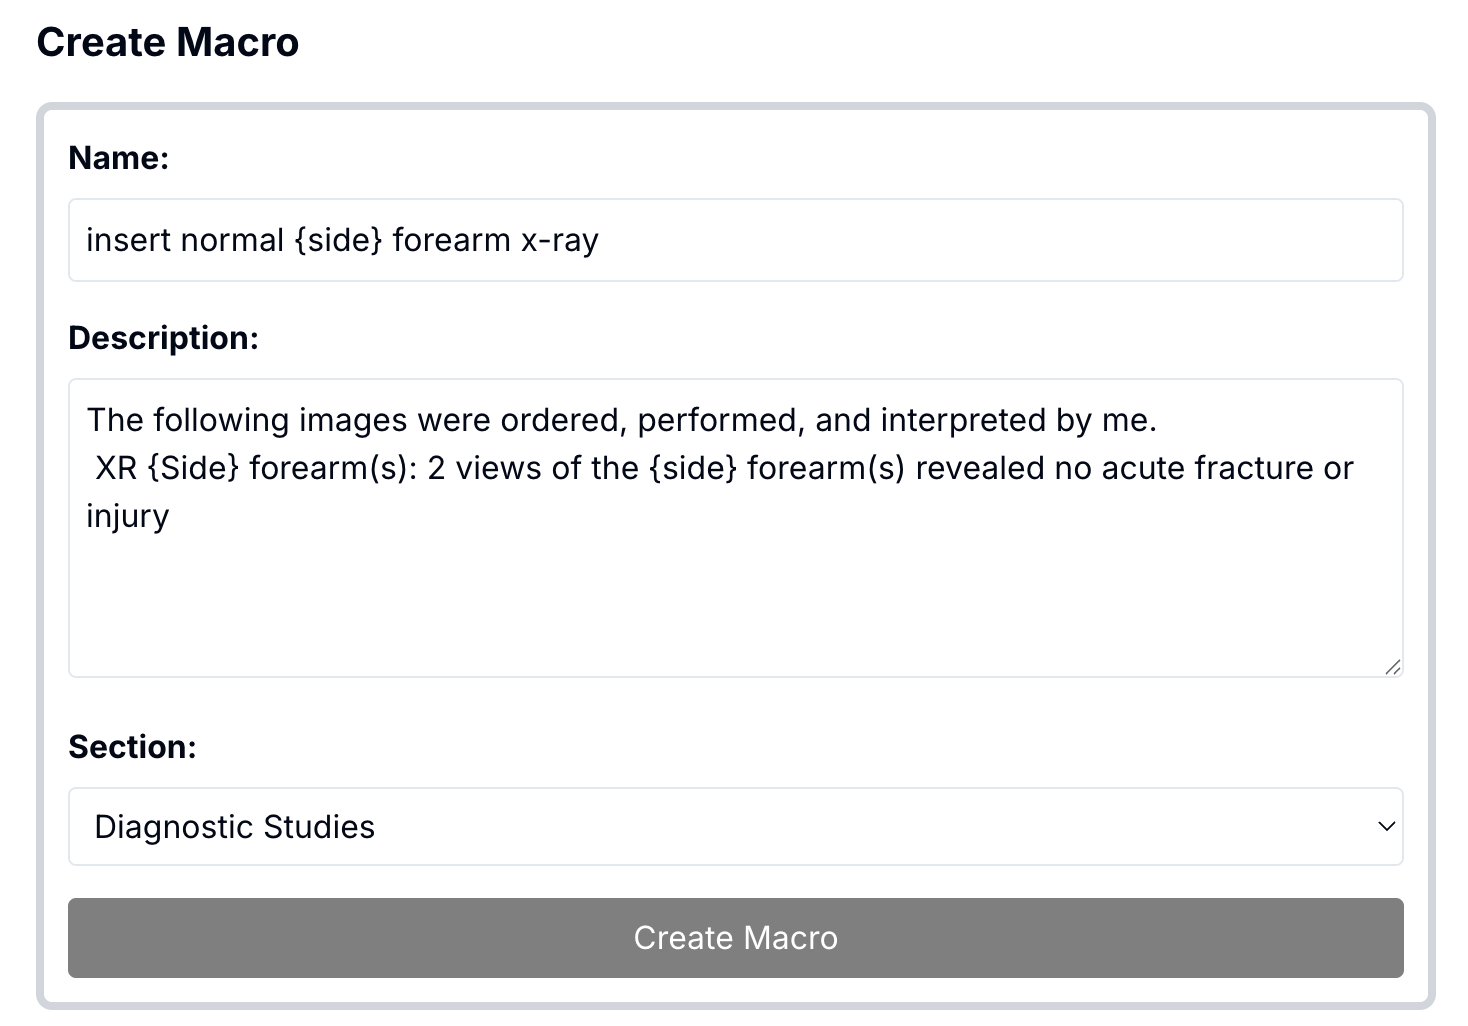
Creating Macros:
Macros allow users to insert saved text into your note with a simple voice command. Best used for frequently used phrases (eg. surgery complications, x-rays, and physical exams)
- • Go to app.orthoscribe.ai to add your macros. Macros can be added and modified at any time under the "Macros" tab on our site
- • If you need assistance using macros, please contact us at support@lotusscientific.com to set up a time to build your macros with one of our physician advisors
Managing/Using Macros:
Create/Manage in web portal → Macros tab.
Sample Template:
Macro: Normal Shoulder Exam
5. Procedures & Automatic Coding
Procedures
- • Templates in web portal → Procedures
- • Automatically recognized; no special voice prompt needed
- • Fill specifics via variables (e.g., side, size, approach) as needed
Automatic Coding (CPT & ICD)
- • Enable in Settings → Automatic Coding
- • Review suggested codes alongside your note
- • Confirm accuracy before copy/paste
How to Use Procedures:
Procedures can be added to your profile at app.orthoscribe.ai under the "Procedures" tab
- AI will automatically recognize procedures from the context of the visit and document them - no voice commands are required
- You no longer need to create separate injection notes for each laterality of finger.
- Our procedure templates are built with variables which the AI fills in
Sample Template:
Procedure: Subacromial Injection
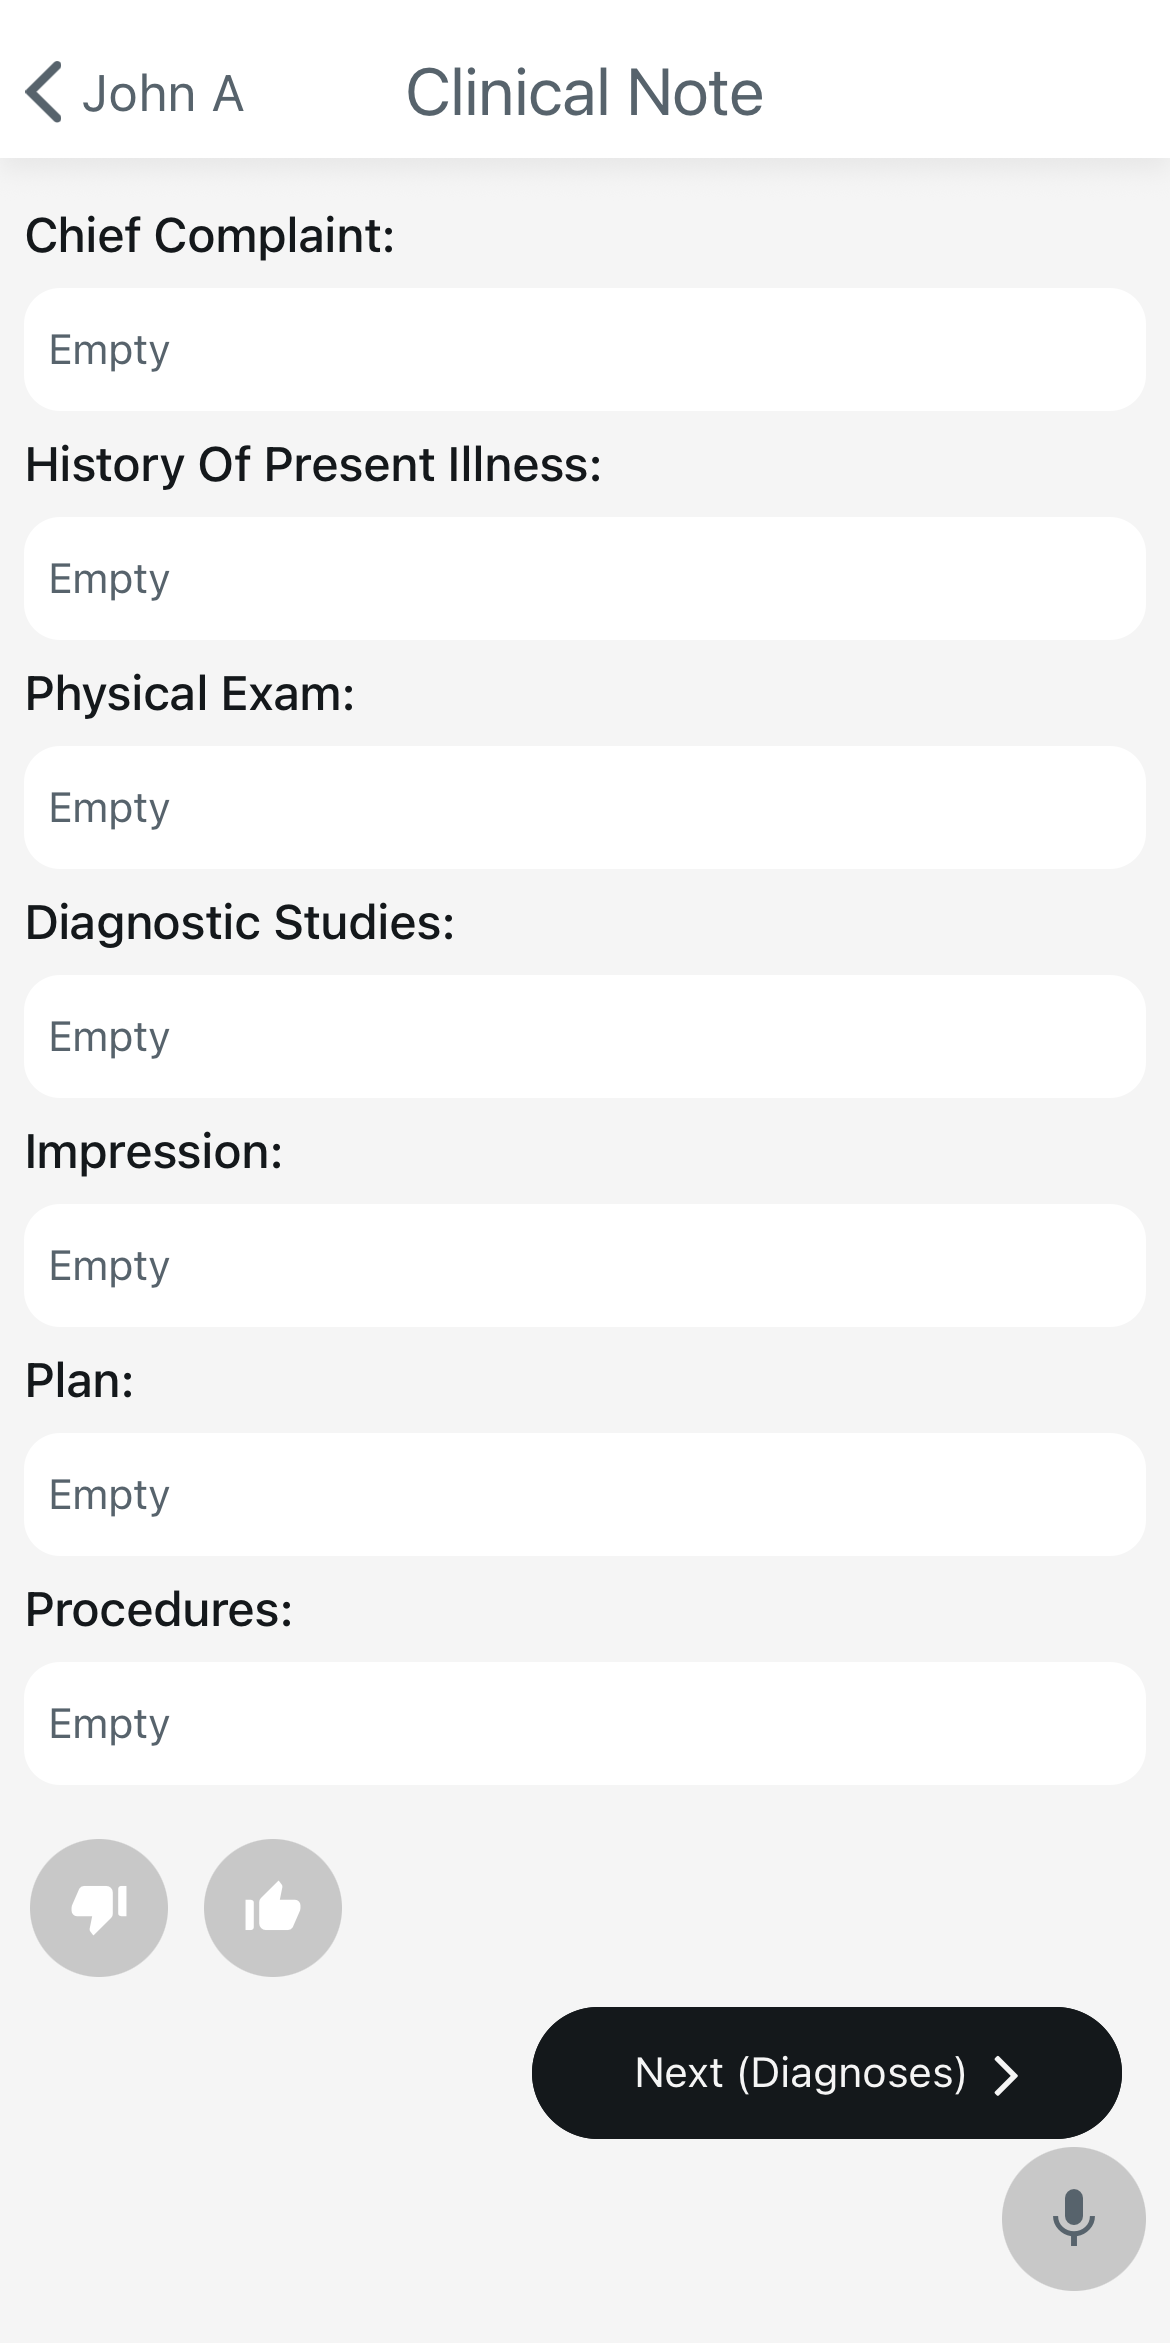
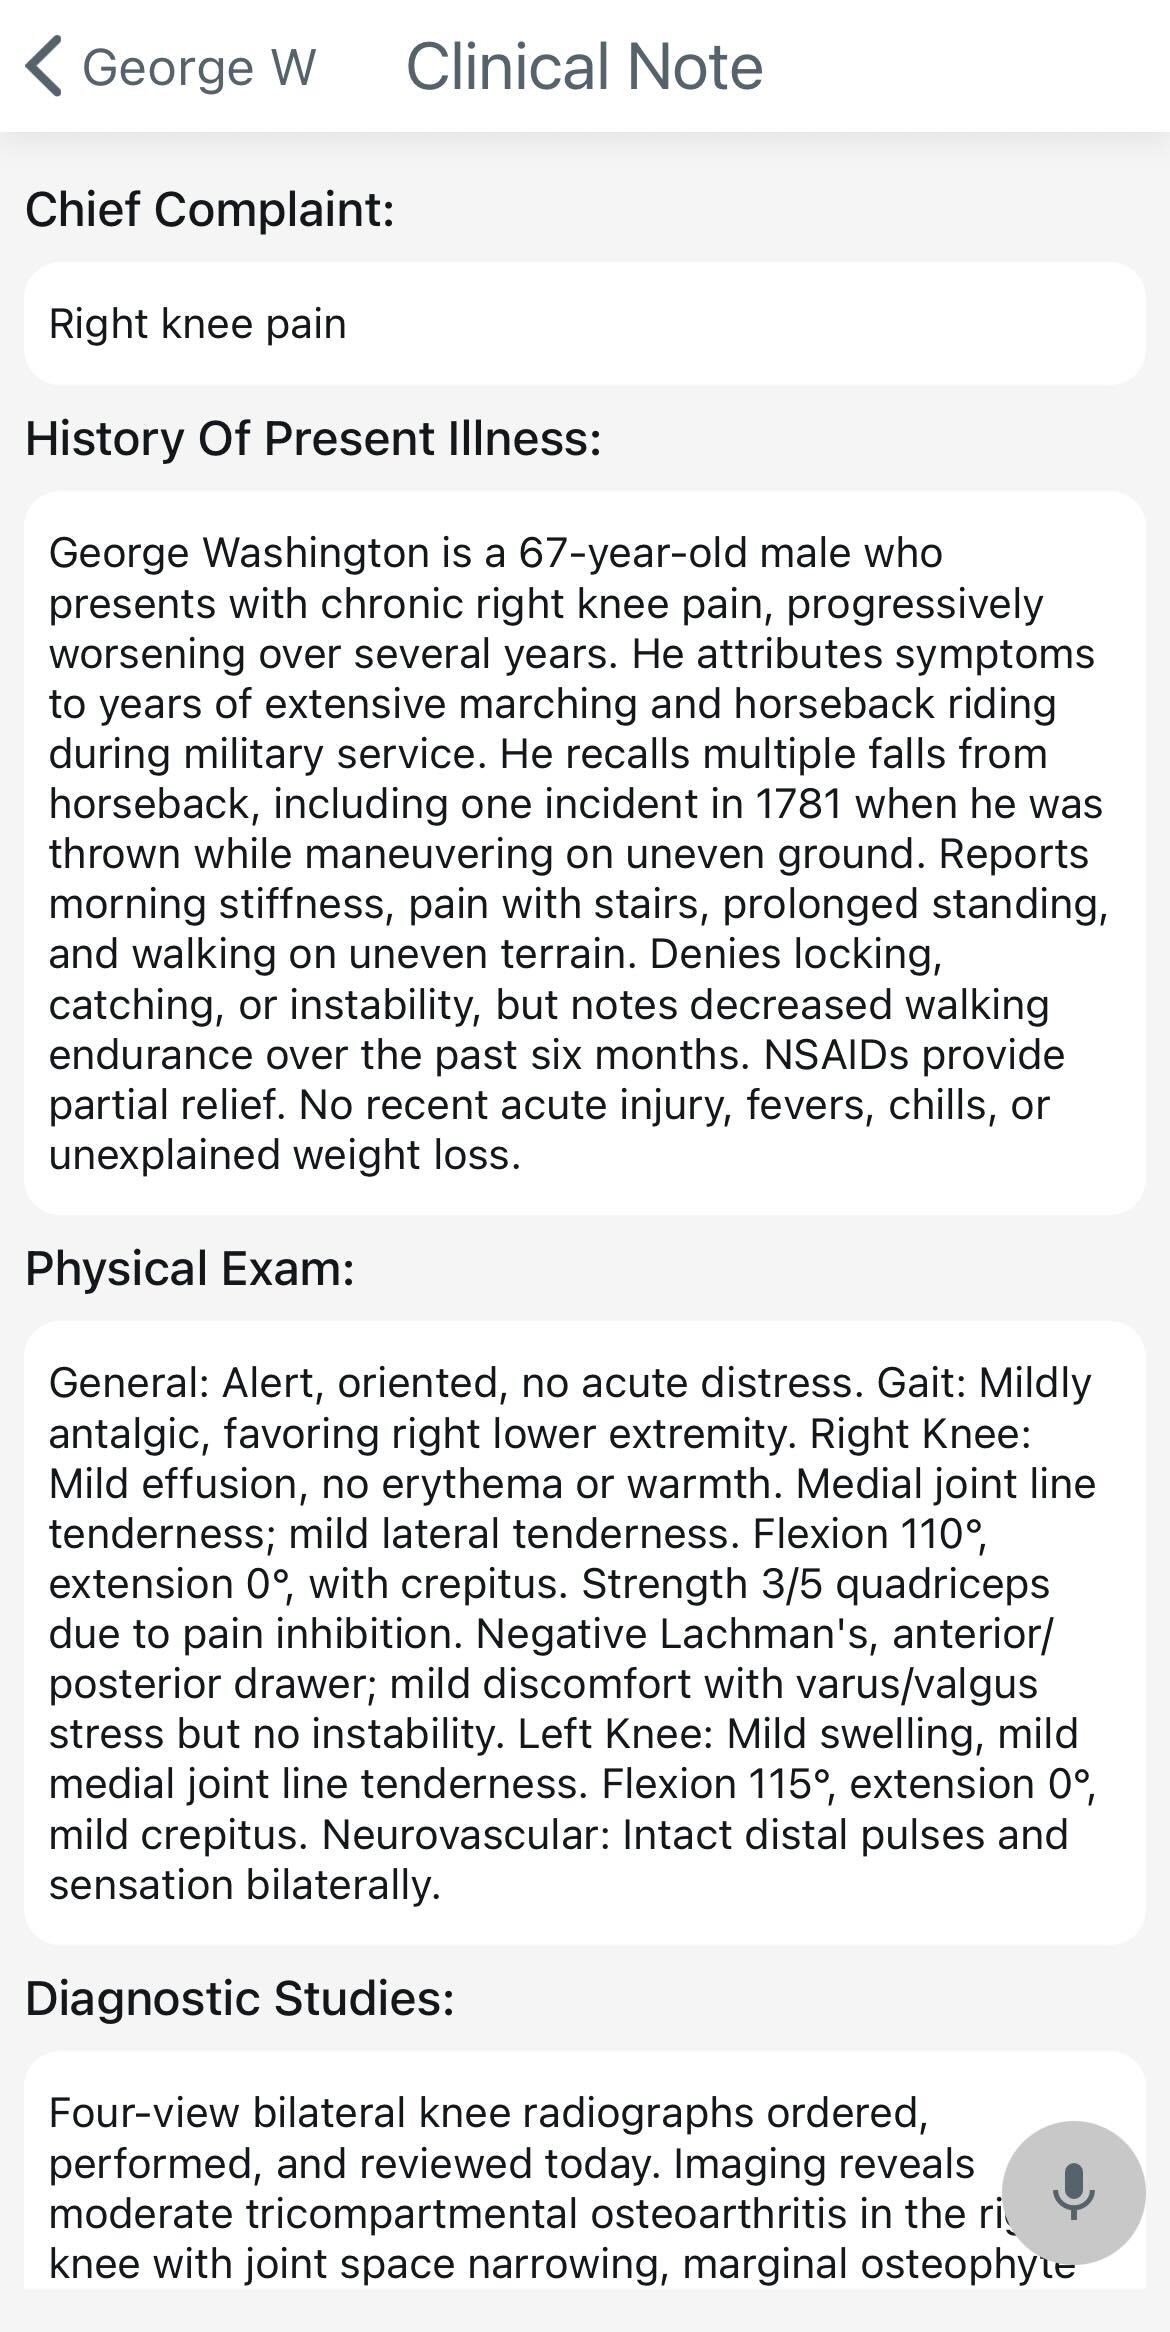
6. Reviewing, Editing & Exporting Notes
On Mobile
Review structured sections and make quick edits.
On Web (app.orthoscribe.ai)
Left panel = encounters list; main panel = note sections.
Actions: Copy entire note (double-box), Edit, Upload/Export, Reprocess.
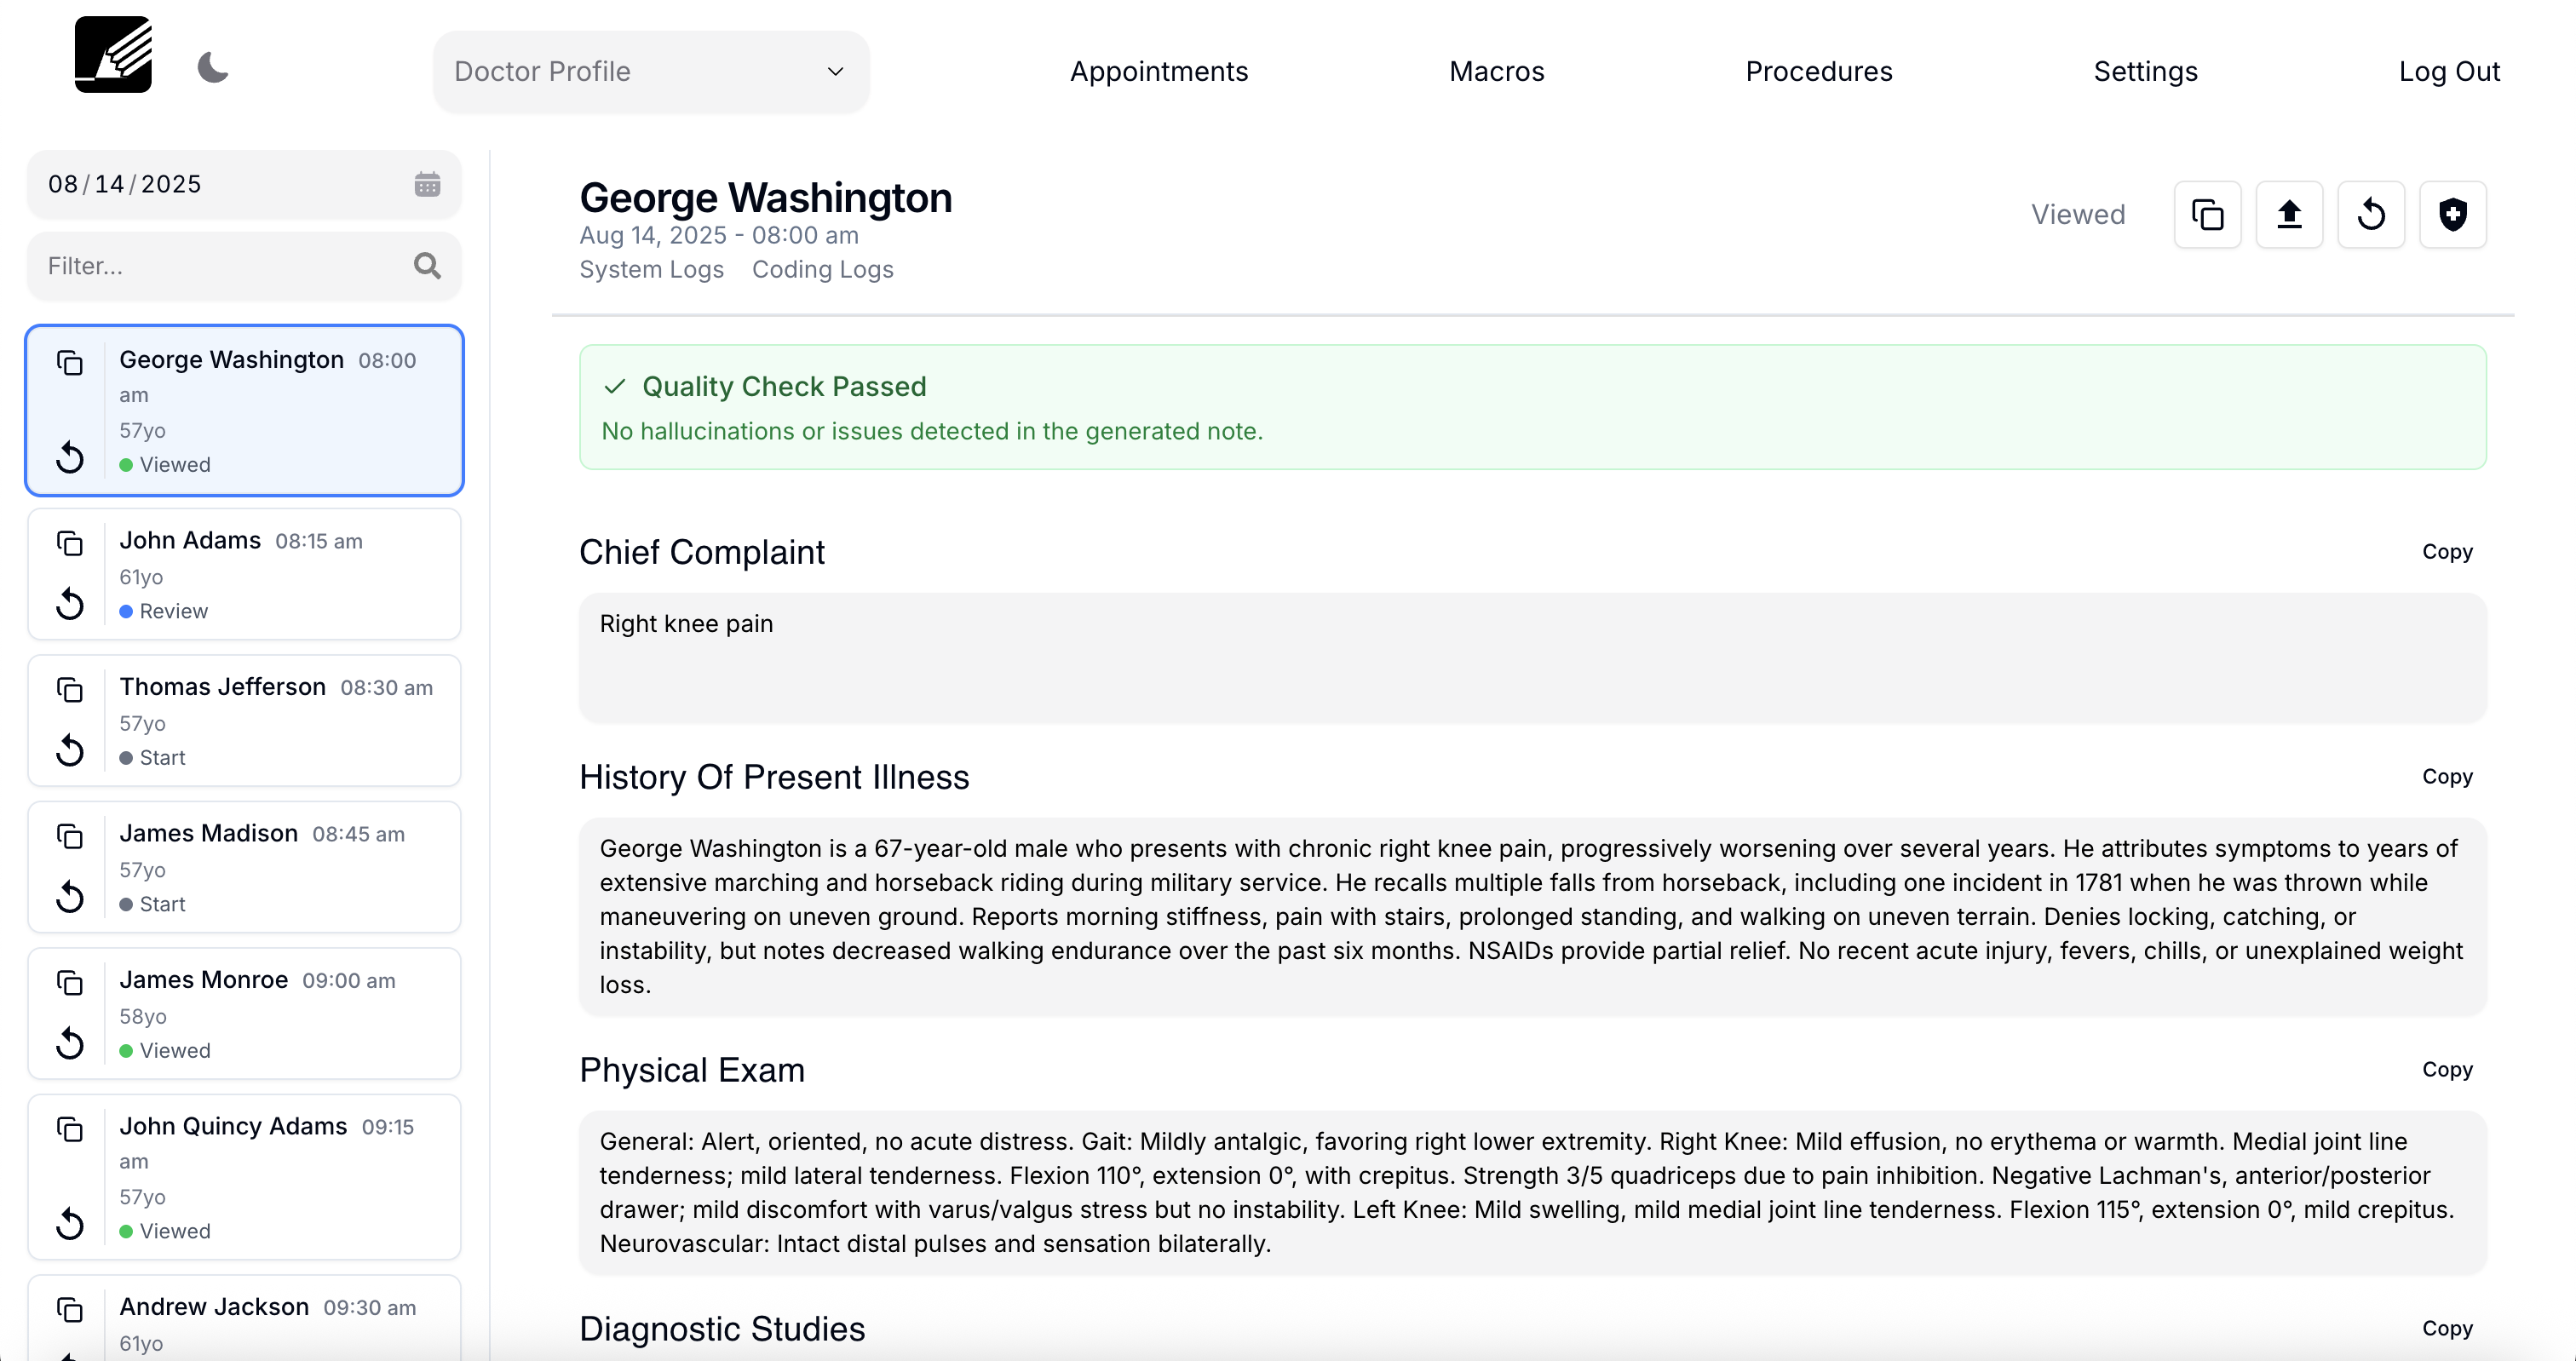
app.OrthoScribe.ai
The OrthoScribe website is a convenient place to review your notes, upload any notes that failed, and edit your macros or procedures.

- Copy Note to clipboard
- Edit note
- Upload note to EMR (does not apply to standalone users)
- Reprocess note
Export Paths
- • Copy from web to EHR (fastest) or dictate with Wireless Mic into EHR fields
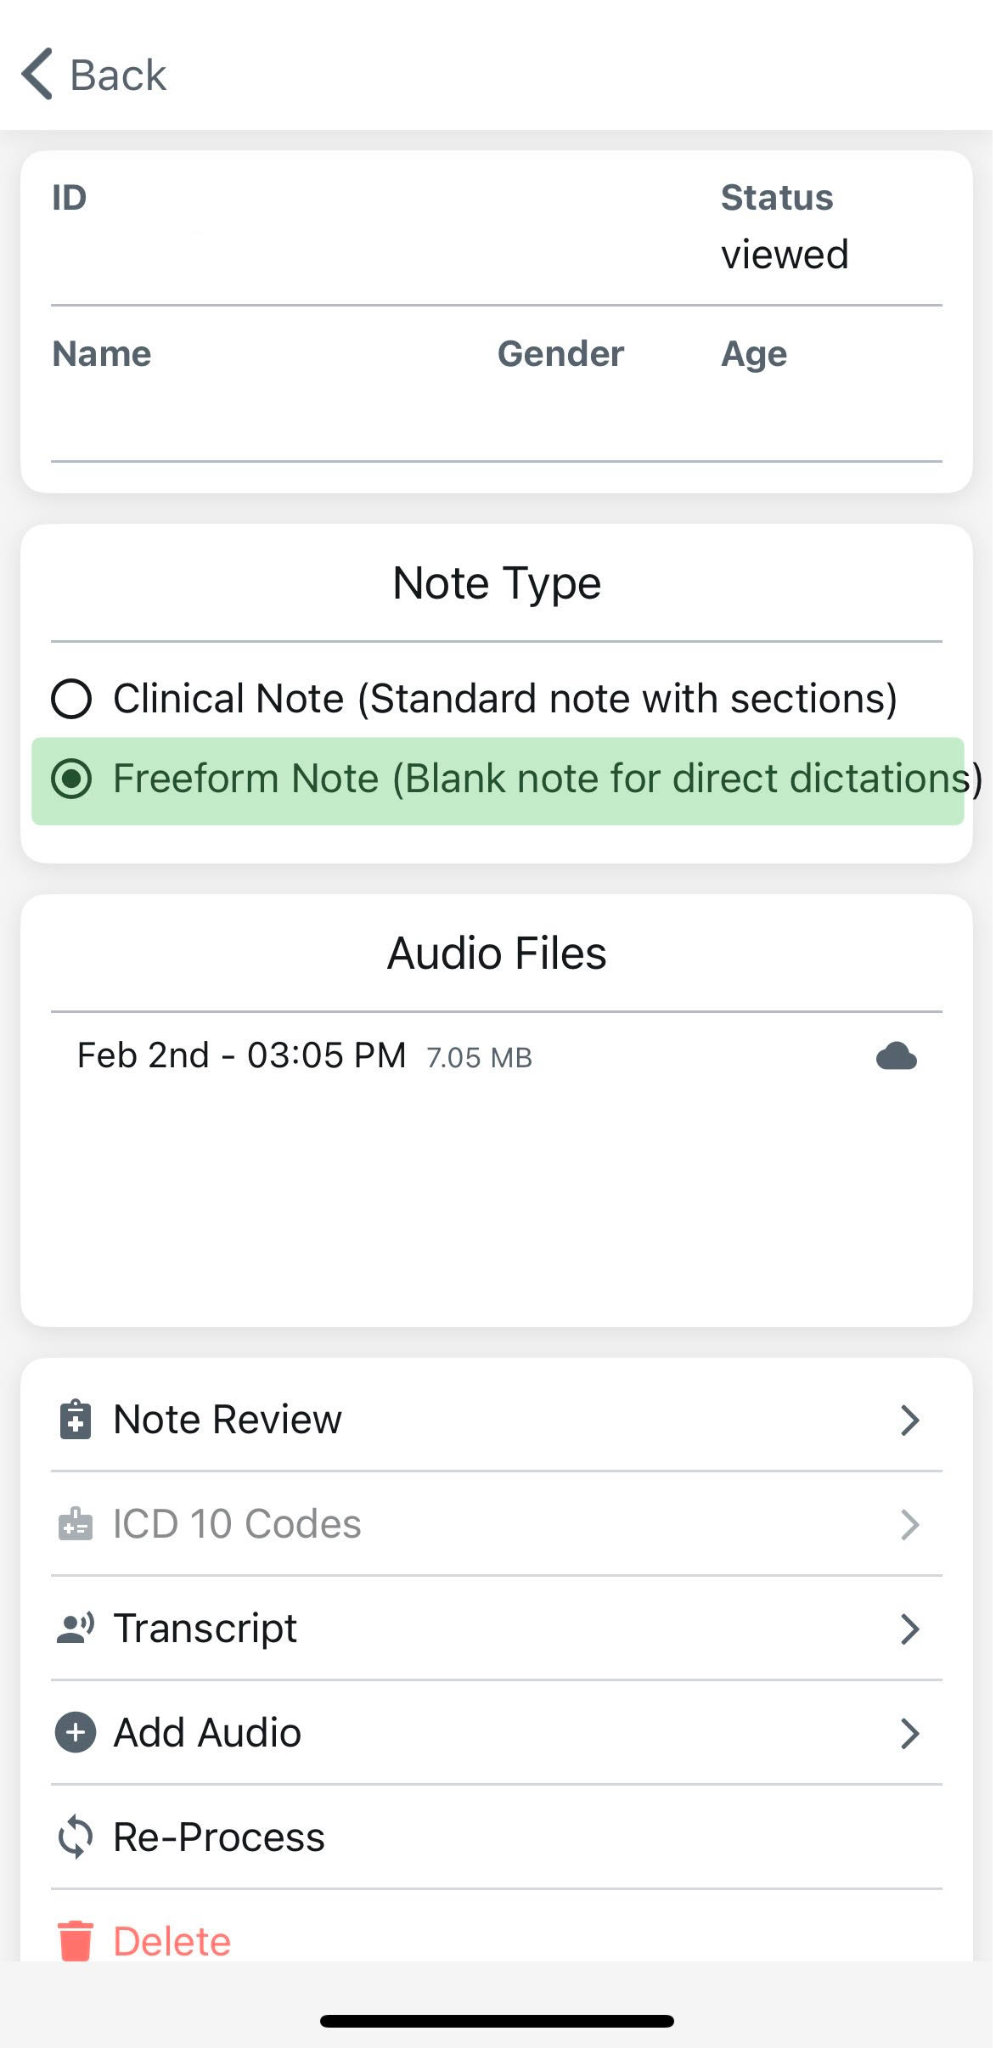
7. Freeform Notes (Op Notes, Letters, etc.)
From a patient, choose Freeform Note. Dictate continuously; we correct punctuation/spacing.
Export: copy from web or dictate via STT
Freeform notes are blank documents which can be dictated and not separated into the separate sections as your clinic notes are. Can be used to dictate operative notes, letters to legal teams or nurse case managers or referring physicians.
To dictate a freeform note, simply click on the patient's name and select "Freeform Note" under Note Type (green in the image below). Start dictating and we will process your dictation with corrections to spelling and punctuation.
Tips and Tricks:
- • You can dictate with or without punctuation. Our AI system will transcribe what you dictate and fill in the appropriate punctuation (periods, commas) as needed.
- • You will have to dictate when you want a "new line" or "new paragraph"
- • We transcribe what you dictate and fix the terminology/punctuation using AI to ensure that the transcriptions are accurate.
8. Apple Watch
Open iPhone app daily (to sync today's list) → use Watch app to start/pause/end recordings with minimal distraction.
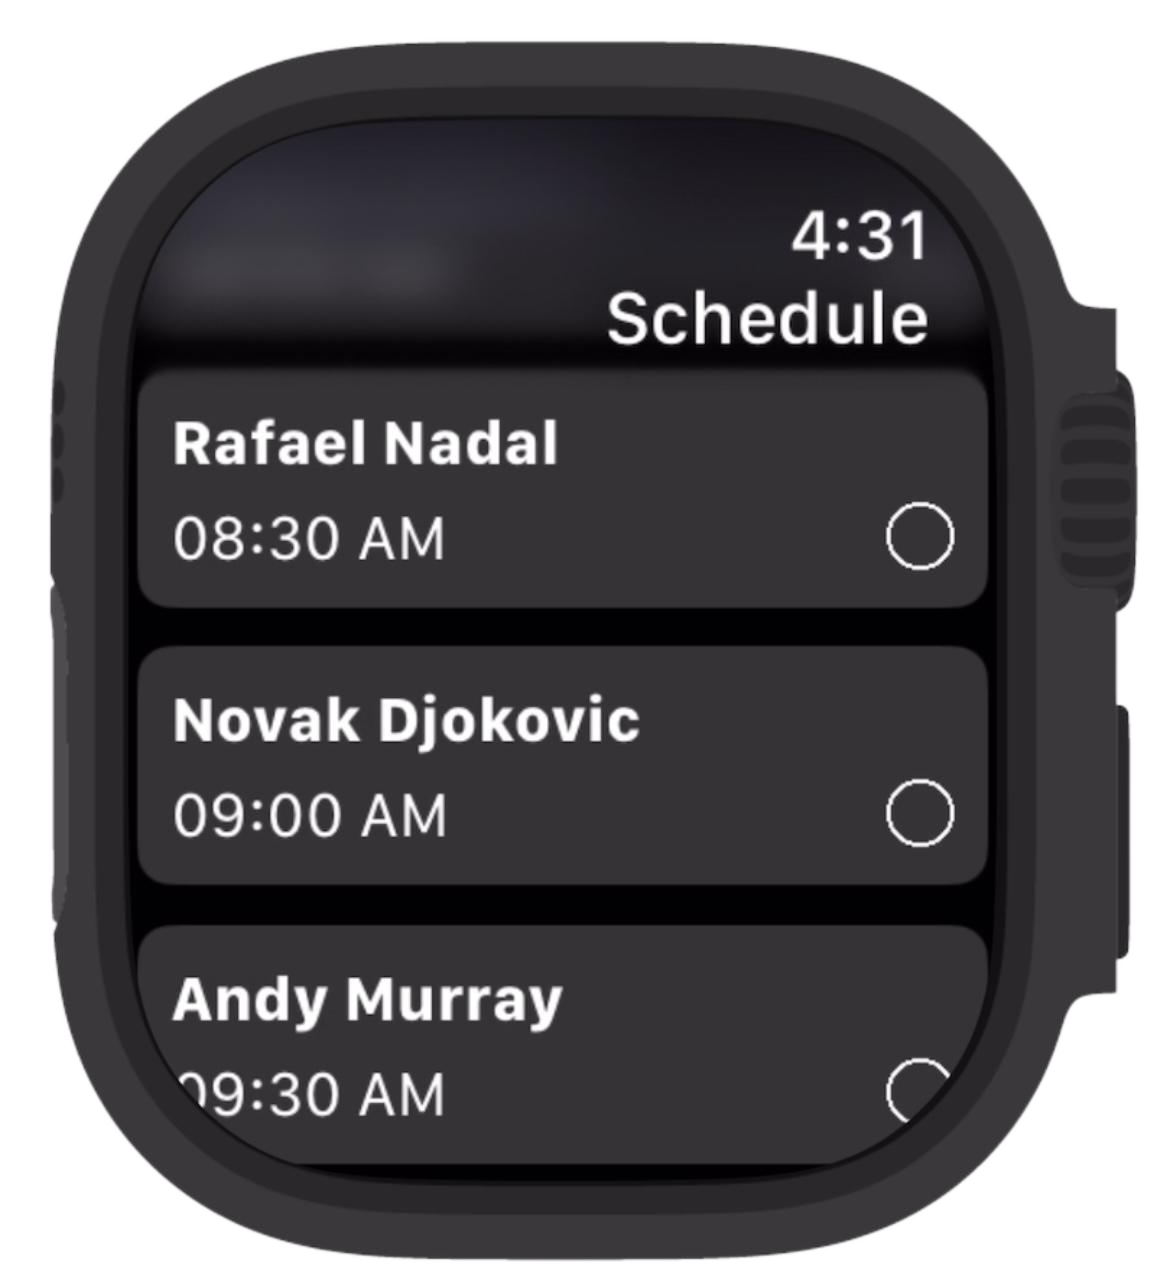
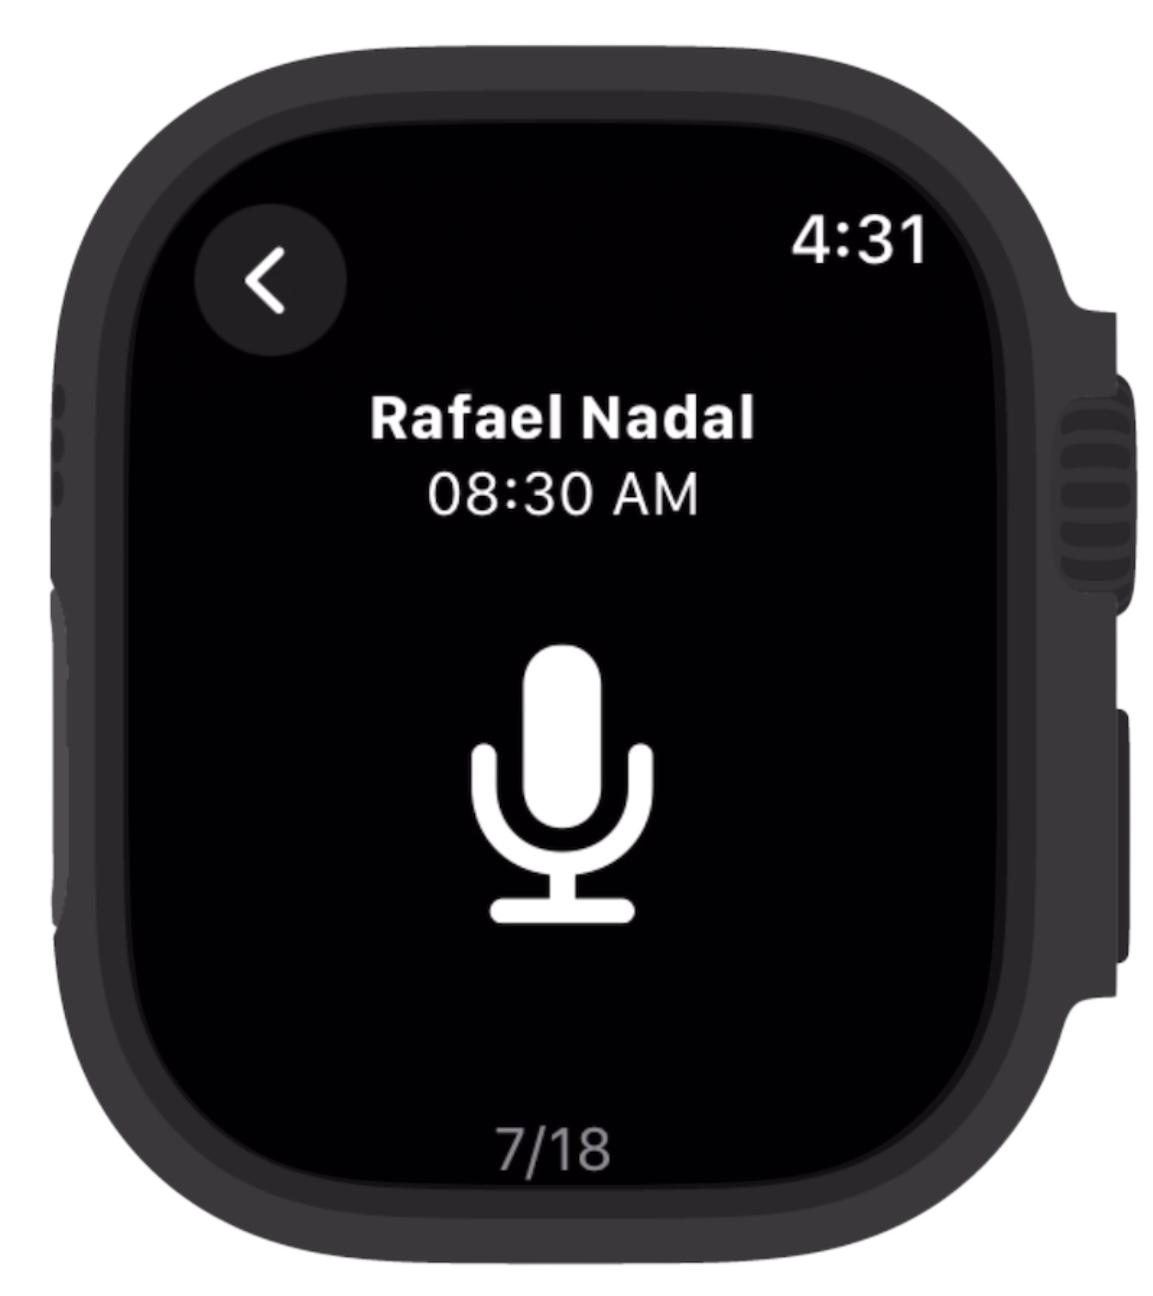
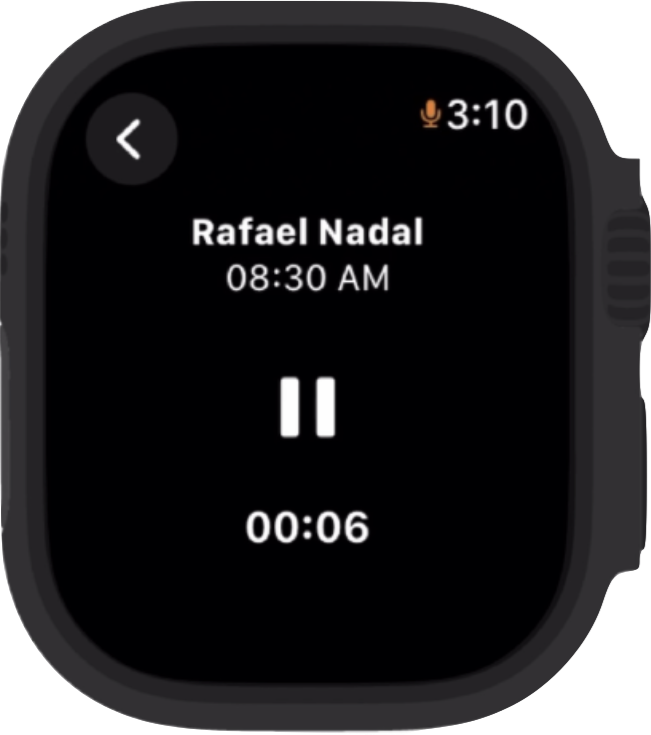
On the recording screen, you can navigate between patients easily by swiping left or right.
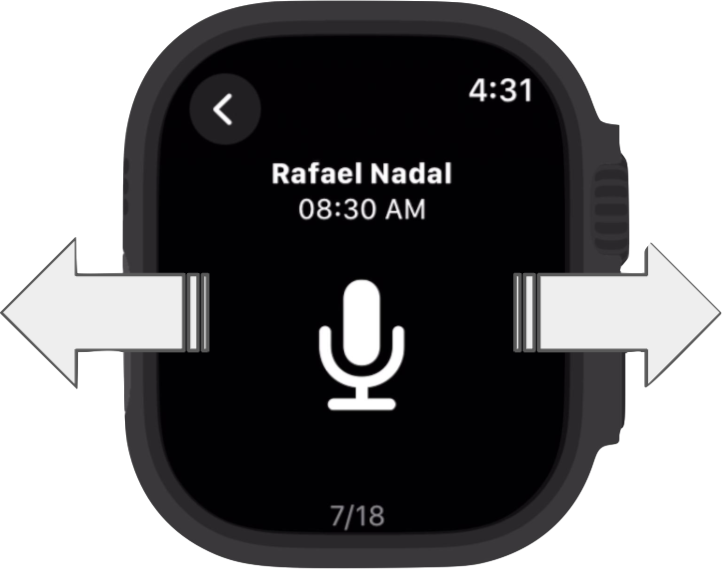
Please see our Apple Watch guide for more details.
9. Troubleshooting & FAQs
Why is nothing appearing on my schedule?
You should confirm the following:
- • Ensure you are on the correct date.
- • Check that your schedule is correctly shared with your provider.
- • Ensure your own schedule is selected at the top of the Schedule page.
- • Pull down to refresh.
- Alternatively, if you have no patients, you can manually add patients to your schedule by clicking the Add Patient button.
Why is the Wireless Mic not typing my speech into text?
Ensure desktop app is open and a text field is focused. If the issue persists, re‑pairing often solves this issue.
If you are having issues pairing, follow the steps in the Wireless Mic Guide.
Is it okay if the recording picked up ambient chit-chat or noise?
Yes, since only clinically relevant content is extracted from the transcript. Even so, you should always review and edit as needed.
Can I make sections of my note always format as paragraphs or bullets?
Yes. Notes can be transcribed in paragraph or bullet point form depending on your preference. Contact support@lotusscientific.com to update your settings.
Why does the app sometimes fail to upload recordings or notes?
Audio stays securely on your phone until uploaded successfully. You can safely continue recording, and the upload will resume once services are restored.
If you have audio that has not uploaded, you will see a cloud icon in the bottom left of your schedule screen. Once you're back online, click that button to upload the audio.
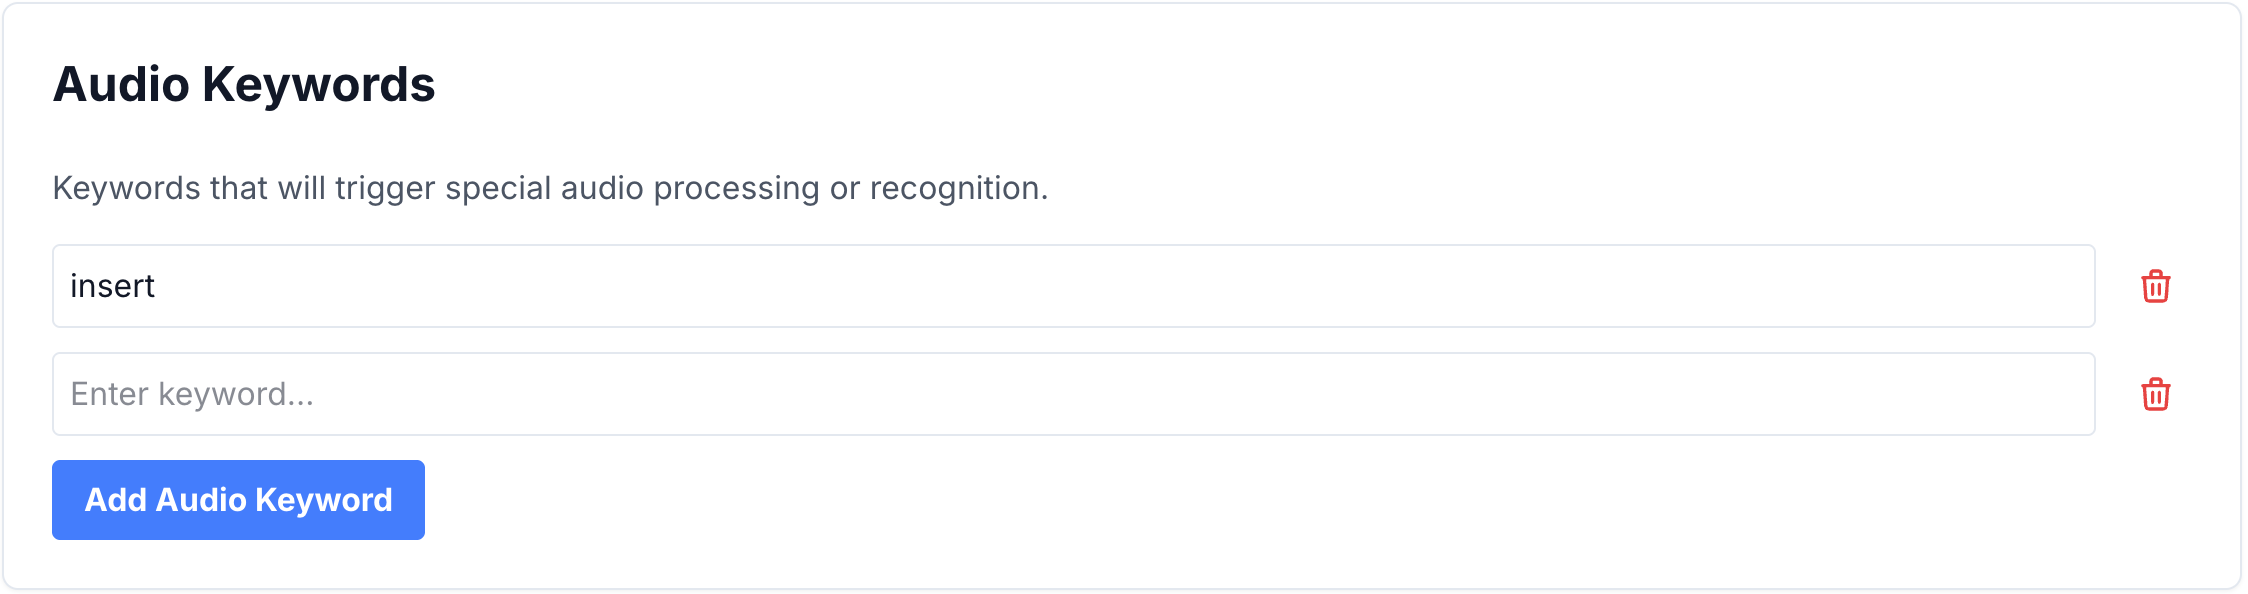
Why is the system mishearing common words? (e.g. "lower extremities")
Using the Word Swap feature you can submit a list of words/phrases that frequently get mistranscribed. In the app, the Word Swap tool can be found under "Settings" → "Speech to Text" where you can set replacements.

In the webapp, it can be found in the "Settings" page.
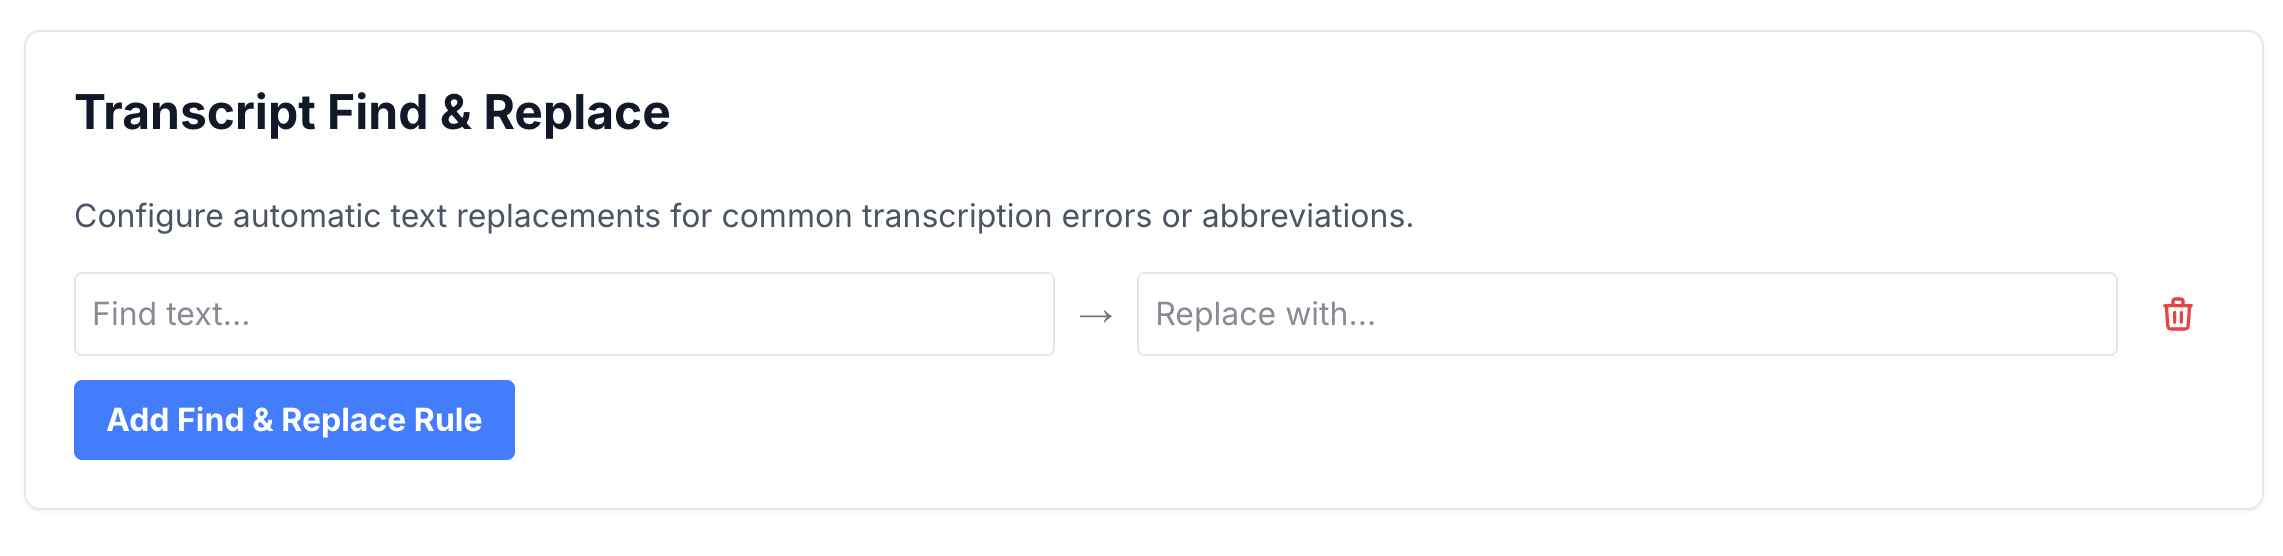
Alternatively, the Audio Keywords feature, found in the webapp Settings, gives the software an indicator to listen for specific words/phrases.
Can I see recommended E/M codes in the app?
Yes, you can enable coding features by going to "Settings" → "Automatic Coding". Then, in the mobile app, after viewing a note, click "Next (Diagnoses)" and "Submit", you'll see E/M codes. They are also visible on the web app at app.orthoscribe.ai.
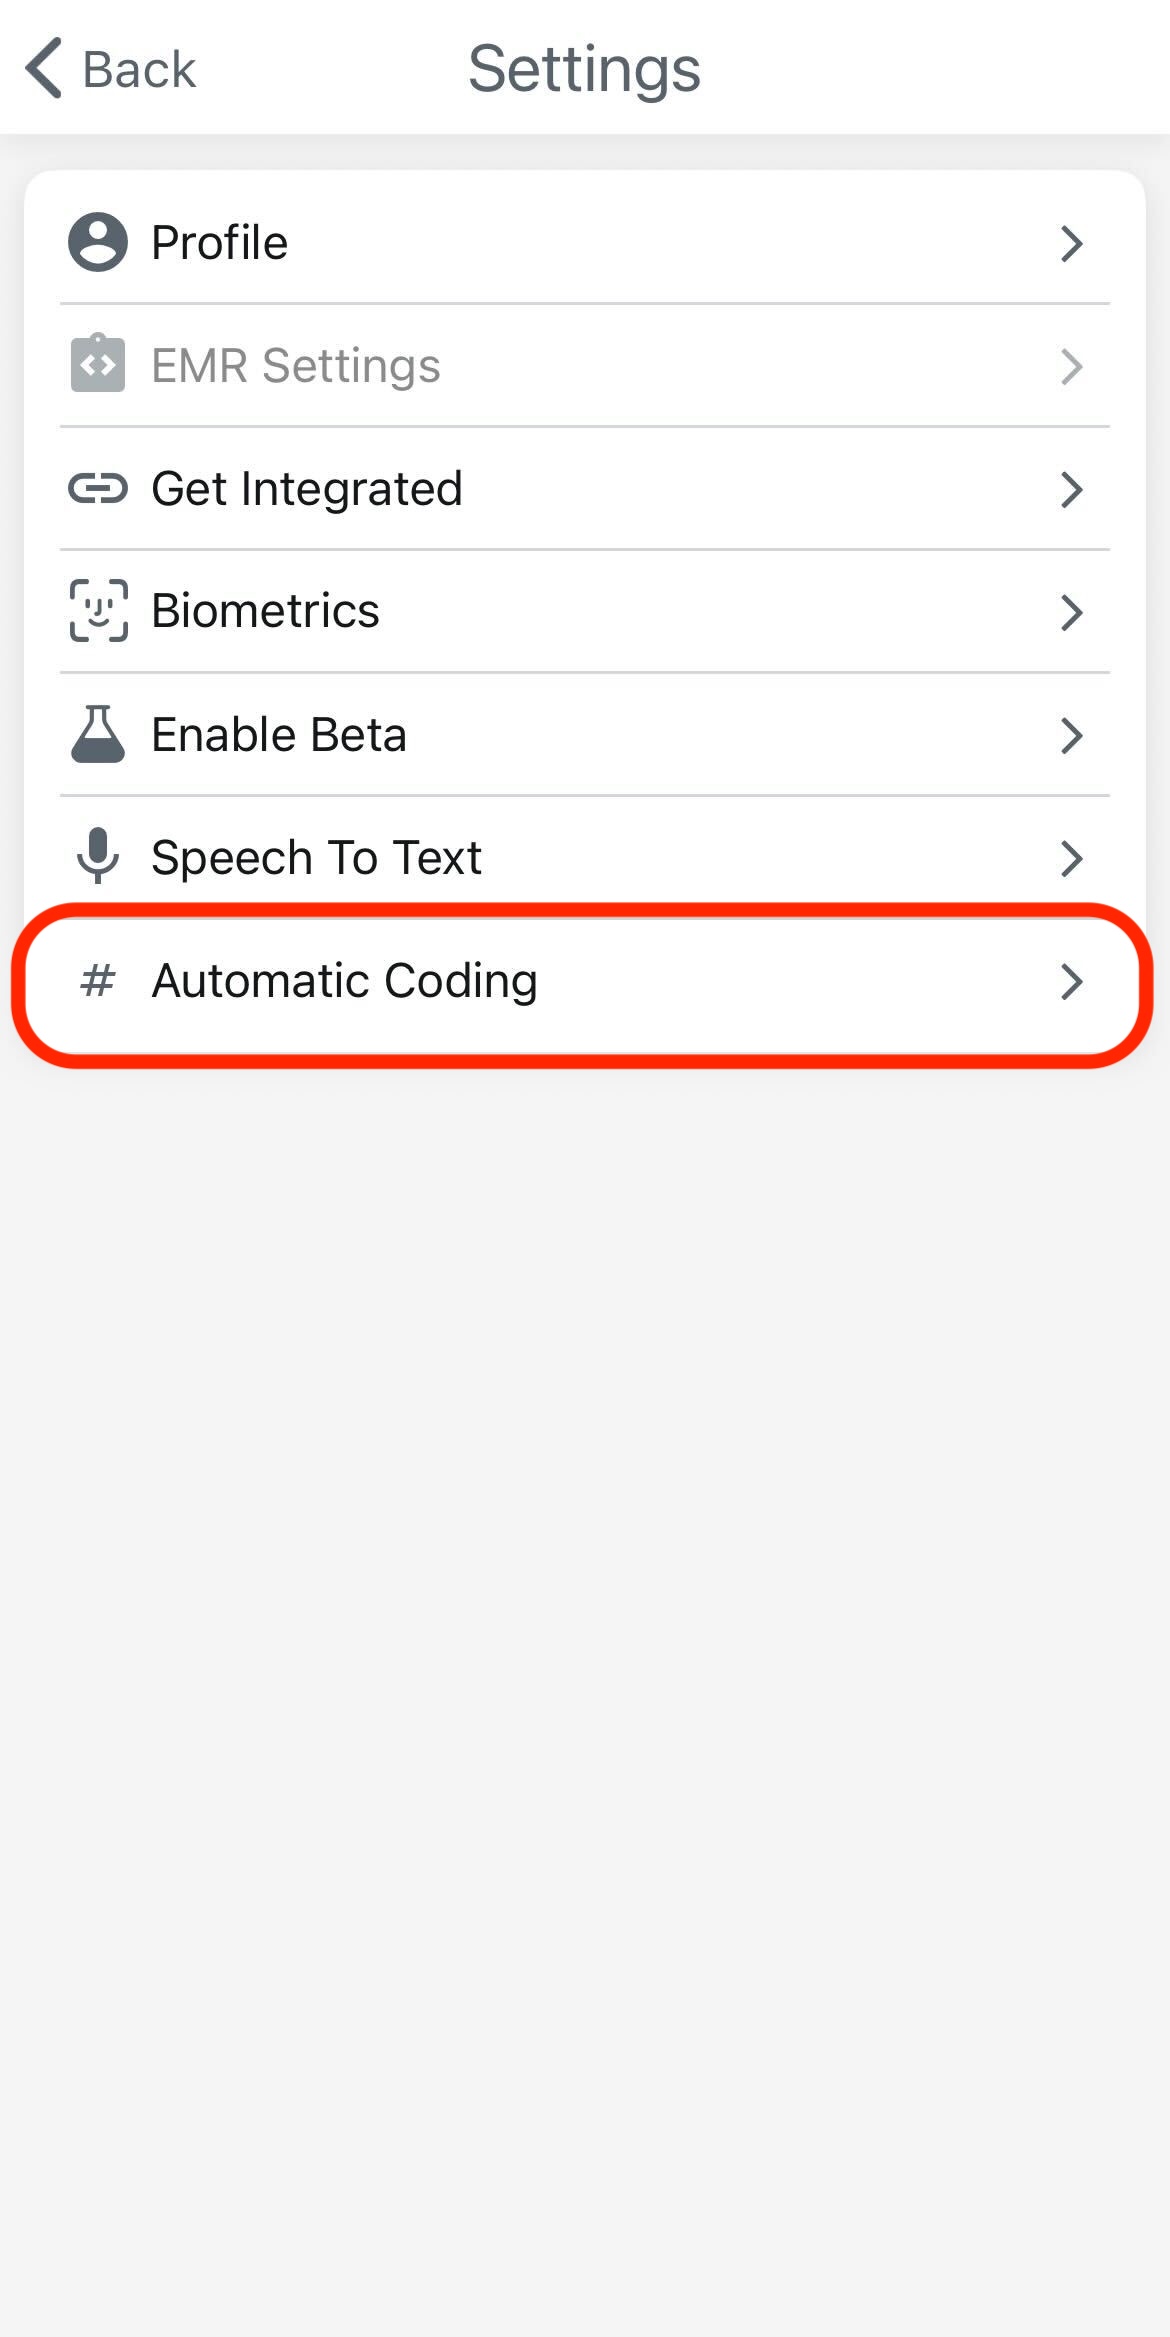
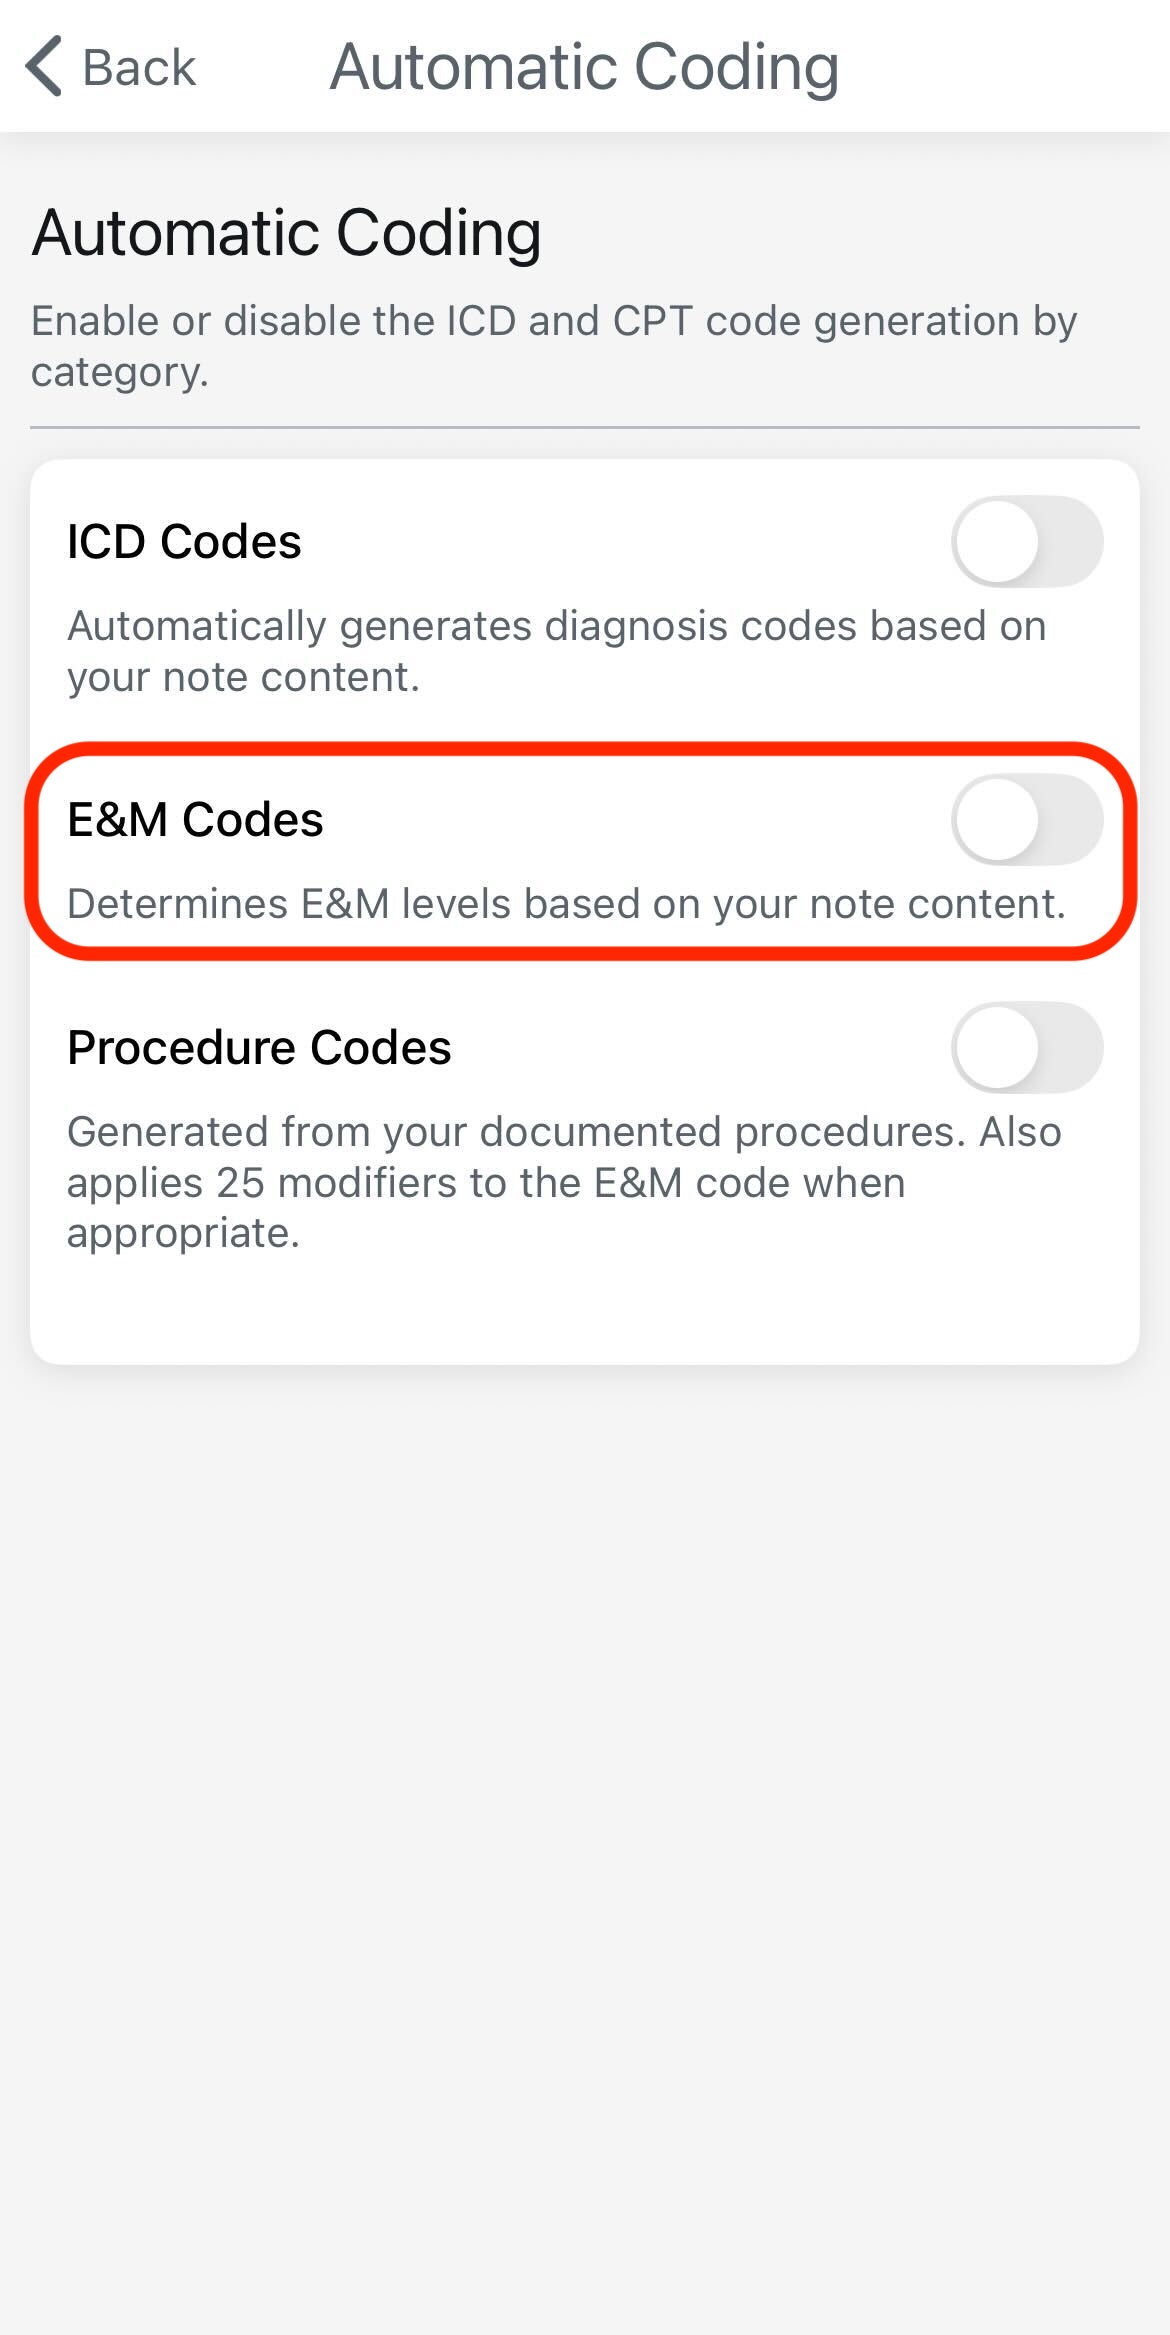
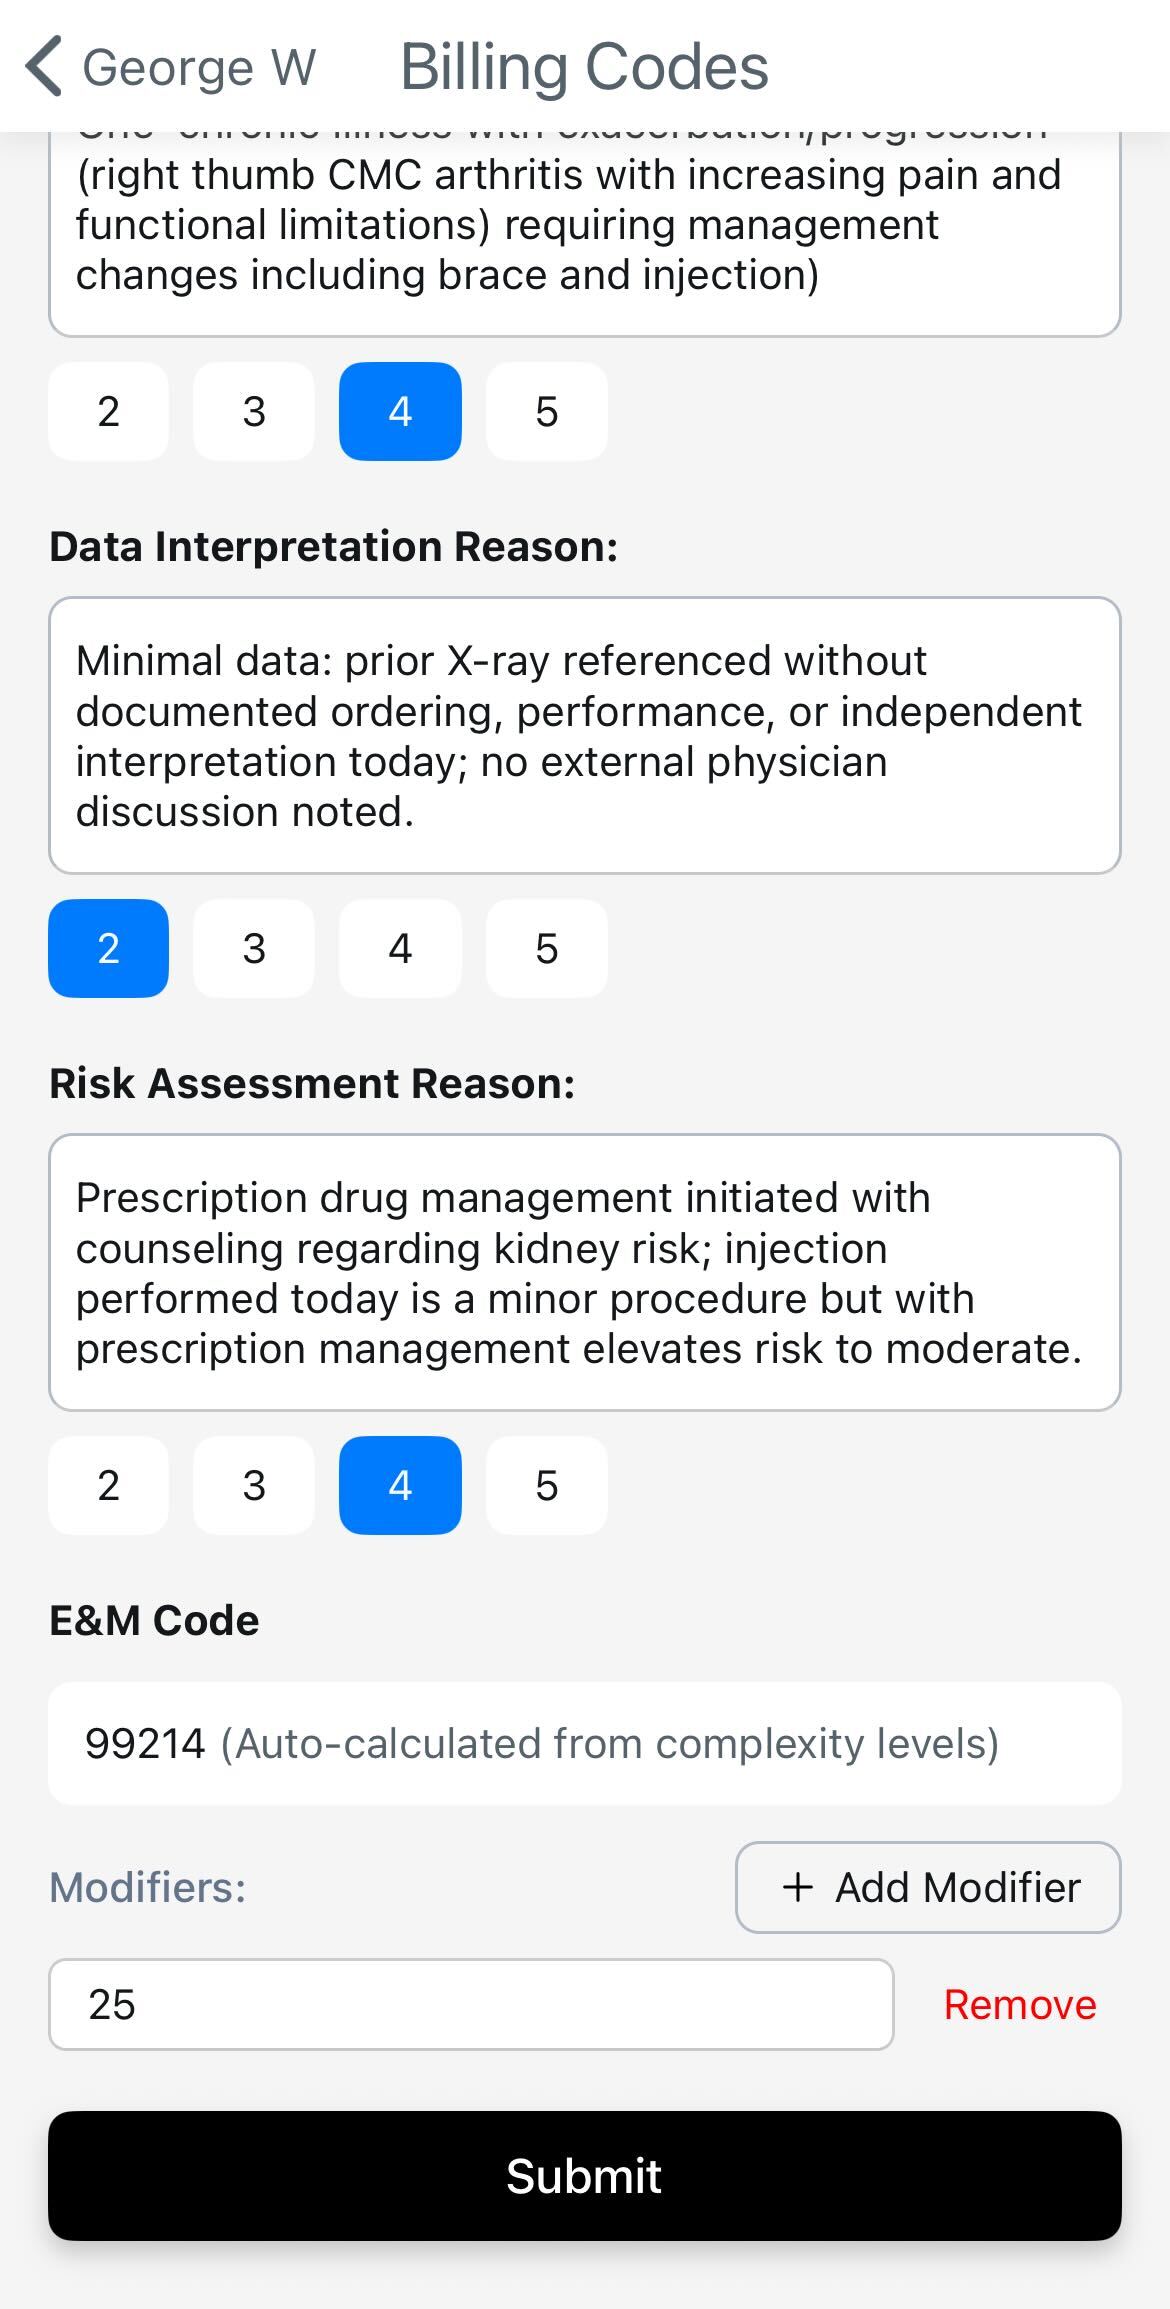
Alternatively, if already enabled you should be able to see the codes in the previously mentioned section.
Can I bulk import macros into OrthoScribe?
Yes, but not automatically. If you share your spreadsheet or macros, support can translate templates into macros and procedures for you.
Why does the app use my Apple ID instead of my work email?
Our app uses Apple ID by default so we can confirm biometric access (Face ID / Touch ID) for security purposes. This keeps your account HIPAA-compliant and ensures your data is protected.
If you'd prefer to sign in with your work email, we can enable single sign-on (SSO). This requires your company's IT department to set up a SAML bridge with us so your work email can be tied into the login flow.
10. Security & Privacy
- • HIPAA‑aligned workflows. Provider‑managed access via Schedule Sharing (revoke anytime)
- • Exports & disclaimers configurable under EMR Settings
- • Contact support for org‑level retention/configuration options
11. Contacts & Support
Clinical onboarding
Sravan Dhulipala — sravan@lotusscientific.com | +1 (404) 771‑8746
Technical support
Recording Encounters (AI Note Service): Note generation can be customized based on your preferences (e.g., automatically number your plan, bullet your physical exam findings). Contact support for advanced configuration.